Crafts from plastic caps. DIY New Year's toys: crafts from plastic caps Toys from plastic bottle caps
Recently, handmade things and crafts, the so-called handmade, which can be made from anything, have become increasingly popular. Plastic plugs did not stand aside and received their second use in original design ideas.
Plastic bottles are available to everyone without exception and are certainly found in every kitchen.

Many people try to immediately throw them away, but there are also creative individuals who, using various life hacks, use them for decoration or useful devices for the home or garden, as in the photo of crafts made from corks.

Today we will talk about crafts made from plastic corks.

Using plastic caps in children's creativity
Children are great dreamers by nature. Give them any object and they can easily transform it into another image. After all, from a very young age, both at home and in the children's group, children are instilled with an interest in handmade crafts.
Plastic bottle caps are an excellent material for children's creativity. Corks can be easily glued, thanks to which various panels, figures and decorative things can be created.

The kids love to tinker with traffic jams and fantasize about various topics: appliqués, toys and figures.

Types of applications
The most favorite craft made from plastic corks among children is a caterpillar. Delight your child by making it out of colorful corks and lengths of his own, and he will play with it all day long.

The caterpillar's face can be made funny, which will inspire the subject. The caterpillar is made very simply, a hole is made in the center of the corks, a fishing line is threaded through it, on which the corks are strung, the muzzle can be made from a Kinder Surprise cone.

Using the same principle, you can make a person, a cat, a dog, etc.

To make a “bird” craft from bottle caps you need: two caps, cardboard, light fabric or natural feathers, such as pigeon feathers. The head and body are made from corks, and the wings are made from cardboard, fabric or feathers.

The “rabbit” applique is made in the same way as the “bird”, the body and head are made of caps, one of them should be of a larger diameter, the ears are made of cardboard and the tail is made of a piece of fur. Children are delighted with such toys. The main thing is that you can do this together with your child.

A three-dimensional “turtle” craft made from corks with your own hands will interest a child more than an applique. It's not difficult to do.

The necessary materials for creativity you will need: a large diameter lid, cotton swabs and an ice cream stick. A lid is glued onto an ice cream stick and green-colored cotton swabs placed crosswise on top.

Specks are drawn on the lid and eyes are made. Your masterpiece is ready. In the same way, you can create spiders, ladybugs, bees, etc., using various available materials.

Mosaic of traffic jams
You can build a mosaic panel from a large number of multi-colored corks. To do this, in addition to corks, you will need good glue or a glue gun so that the composition does not fall apart in the future.
Note!


First of all, choose a surface for creativity, decide on the image and get to work. The panel parts are attached by gluing them one by one to the prepared surface. If you want to mount them from the reverse side, then you will need screws to secure them.

An interesting solution for the panel would be the option of folding lids of different sizes one into one according to the matryoshka principle. For example, a yellow sun made from such folded lids looks great.

The “cockerel” craft is also entertaining, but requires some skills and time. To do this, you need to make a plywood base, prime it, apply an outline and use glue to fix the plugs according to the image diagram. The result is an original creation.
Magnets
An ideal option for beginners would be making refrigerator magnets. Nowadays, almost all refrigerators are decorated with all kinds of magnets and not only to hide any defects.

Making them will require very little time and the following materials: corks of different colors, magnets themselves, glue, alcohol solution, paints, multi-colored paper, felt-tip pens.

Note!

First, degrease the cork with alcohol. Glue a magnet inside the cork. We cover them with circles of colored paper, cut out in advance.

You can decorate multi-colored circles with names, drawings, letters or bows ahead of time too. Use letter circles to create a fun alphabet. You can also make a picture using certain Internet resources as assistants.

Foot massage mat
One of the most popular craft options is a foot massage mat. Making a rug is an easy and simple process using multi-colored corks. And subsequently the rug looks bright, unusual, and its use is good for health.

Walk on it for about 15 minutes a day to achieve relaxation and general strengthening of the body, due to the impact of walking through traffic jams on the nerve endings of the feet.

Prepare multi-colored corks, an awl, and thick fishing line. For a hexagon-shaped rug, you will need 10-15 pieces of corks on one side. The total number of stoppers per product can be calculated as follows: multiply the number of stoppers on one side by the number of sides of the rug and subtract the number of repeating stoppers.

Note!

Then make 6 holes in all the plugs with an awl. Next, using the weaving method, starting with the outer plugs, you should braid all the parts to form a hexagon. A rug made of multi-colored corks in the shape of flowers will have a beautiful appearance.
Hallway rug
A hand-made hallway rug would be practical for everyday use. Using a glue gun, bottle caps are glued together in any shape and form; colored caps are used to add brightness. It is easy and simple to clean from dirt.

But it also has its drawbacks: it can scratch the linoleum surface, so it is better to use it for tiles.

For example, in the bathroom. If the mat will slide on the surface, it should be secured with rubber circles on the back side of the mat.

Country curtains for doorways
At the dacha you can find many options for using both bottles and the corks themselves. Here fantasy has no limits. But the most popular idea is to decorate doorways with curtains made of plastic corks; this is financially economical and easy to manufacture.

And as a result - beautiful unusual curtains. To do this, you need a large number of multi-colored caps, fishing line, an awl, a hammer, a nail and a needle.

The step-by-step scheme for making curtains looks like this:
- Holes are made in the lids on both sides.
- If the curtains are made according to a pattern, it is necessary to lay out the covers in accordance with it.
- The corks are strung on a fishing line of a certain length, you should start from the bottom of the 1st row up, and then immediately move to the 2nd row.
- Secure with knots, singeing the edges of the fishing line.
- String row 3-4, row 5-6, etc., as in step 2.
- Be sure to mark the transition from one row to another to make the work easier.
- Markings are made on the doors for attaching curtains with equal intervals between them.
- The curtains will be secured to the wooden door with stoppers for fastening, according to the markings.
- The first thread (row 1-2) and fix it on the door with a hammer and nails.

Crafts from corks for the garden
You can decorate your summer cottage with paths made of plastic corks. But do not forget that such paths have a decorative function of paths, and not a fundamental one. In winter they are very slippery.


For this you will need: large quantities of corks and different colors, sand, construction glue, boards, cement.

The procedure for creating garden paths is as follows:
- The first step is to make markings for laying the plugs according to certain sizes and in the designated place.
- The top layer of soil is removed and a trench is dug 10 cm deep. Formwork made of wooden boards is installed in the trench, into which about 5 cm of sand is poured.
- A cement mortar is made from sand and cement (1:4) with the addition of glue.
- The solution is poured into the trench, and plugs are pressed into it according to your sketch image. This is done carefully and evenly, at the same level, leaving only the top of the plugs without cement.
- After the cement mortar has been adhered, its remains are cleaned from the surface of the path with a stiff brush.
- At the end of the work, the formwork is removed.
- Curbs are being installed.

Using the same principles, using your multifaceted imagination, you can make other crafts using wine corks, but that’s another story.

Photos of crafts made from corks


Many owners of suburban areas like them. If you look at their creativity from the outside, it may seem that there is an unspoken competition for the most original idea. Craftsmen from the people create amazing things, but they complain that the material, although cheap, takes a long time to assemble. But when there are enough traffic jams, real masterpieces emerge from the hands of craftsmen.
Vernissage of crafts made from plastic bottle caps
Let's take a walk around the dachas and see what our neighbors have done there.
Another popular product is summer curtains made from cork. They can be plain or colored, with floral or geometric patterns.
White corks can be assembled for a lamp on the veranda, and colored ones are suitable for decorating a garden table.
The theme also includes crafts in the shapes of animals and flowers. Butterflies, dragonflies, and caterpillars inhabit benches and trees; daisies and seven-flowered flowers complement compositions of fresh flowers and serve as decoration for children's playgrounds.
Cork mosaics are used to decorate the garden and the interior of the house. Lay out from them and garden paths.
As you can see, in most cases, corks are used as a finishing material, but their capabilities do not end there. Armed with fishing line and an awl, people sew door and massage mats from them. Let's try to make such a rug.
Mastery Lessons
Understanding that right now you don’t have 2-3 bags of corks stored at home, we will only tell you how and what garden crafts you can make from bottle caps with your own hands. All you have to do is choose the idea you like and start collecting material.
Massage Mat
At the dacha we not only relax, but also work hard. By the end of the day, your legs get tired and require rest. To help them get back to normal faster, we’ll make a massage mat from plastic bottle caps for the dacha, and consider two options.
Scheme for making a small massage mat.
Take 19 caps (colors of your choice), burn 6 holes in each and fasten with fishing line in four steps (shown by lines of 4 colors)
To create a more reliable design you need to take:
- traffic jams
- fishing line
- awl (you can use a nail or a knitting needle)
Let's start weaving:
- In each lid we make 6 holes with a heated awl or nail, placing them evenly around the entire circumference.
- The shape of the rug is hexagon. The length of one side is equal to 10 covers. This means that the outer side of our rug will consist of 54 covers.
- We assemble from the edge to the center of the rug, passing the fishing line, as shown in the figure.
- The weaving pattern is shown in a small fragment, but it is not difficult to transfer it to the full size of the product. For clarity, each stage of weaving is shown with colored parts of the fishing line; it is clear that there is only one fishing line in the work.
- Having finished weaving, we secure the end of the fishing line by melting it.
Recently, folk craftsmen have been making crafts from various waste materials. Crafts made from plastic bottle caps are especially popular. They look bright and attractive, are not afraid of moisture and sunlight, so they are perfect for decorating a summer cottage. You can also involve children in creativity; they will really like this activity.
Making crafts with children
Plastic corks are an excellent material for children's creativity.. They can be glued, strung on a fishing line and decorated, resulting in the appearance of funny figures, panels and decorative items.
 First, you can try making an alphabet magnet for your refrigerator. Using glue, you need to fix the magnet on the surface of the lid, and on a sheet of paper draw circles equal to the diameter of the lid. Write letters inside each circle, cut out circles and glue them inside the lid. This will create a useful and fun alphabet. The child will play with homemade magnets and at the same time become familiar with letters. In the same way, you can do arithmetic typing by writing numbers instead of letters.
Another type of craft made from bottle caps is applique. A fish aquarium made of lids looks unusual . You will need:
- Lids of different colors and sizes.
- Colored paper.
- Blue or light blue cardboard.
- Plastic eyes. If you don’t have any ready-made ones, you can draw them with a felt-tip pen or cut them out of paper.
 You need to cut out triangles from colored paper, they will serve as the tails of the fish. Then stick them on blue cardboard in any order. Secure the plugs to the tails with glue or double-sided tape. Place ready-made eyes on the lids (or draw them with a marker). Cut out algae of various sizes and shapes from green paper. Paint on the bubbles with white paint to make the fish look as if they were alive. The child needs to be given room for imagination: make pebbles for the bottom or depict an underwater castle.
Children can make simple animal figurines, flat puppets, and silhouettes of characters they know.
This is easy to do: you need to glue two or three covers together, fix them on a cardboard base and decorate. There is another way that you can make from corks: they can be collected on a fishing line, like beads, to obtain three-dimensional figures of insects and animals.
 Boys will love designing a robot A. To do this you will need colored caps, cord and an awl. First you need to make holes in the center of the lids. To make the legs, fasten the four lids in the center, placing them on top of each other. Also make a second leg. You need to start assembling the arms from the edge of the lid, then place three pieces one on top of the other and pass the cord through the center.
Next, proceed to the robot body: place two lids on edges, and place a flat one between them. Assemble another similar design. Secure both parts with a cord and hide the knots under the caps. For the head, connect the two caps in the center with a cord. A wonderful DIY toy is ready!
Robots can be decorated using mosaics, chocolate egg packaging and plastic boxes. It all depends on the imagination of the young designer.
If there are a lot of traffic jams, then you can try to make a mosaic. You will need: corks, glue gun or screws, sketch of the drawing. First of all, you need to decide on the surface on which the sketch of the future composition will be placed. If it is a wooden surface, then you can use glue. The corks are glued one by one to the surface in accordance with the pattern. If you need to attach it from the back side, it is better to use screws. A similar mosaic can be placed on the facade of a house or on a fence, or decorate a gazebo or bathhouse.
 When attaching plugs to a concrete or brick wall, you will need a special compound. This could be cement, a plaster composition, or a base for laying tiles. The corks are glued gradually, filling the entire surface in small sections.
You can also cut out some shape from plywood and use glue to fix the lids on it according to the sketch of the picture. It will be interesting to decorate the garden with such figures, giving it a cheerful and unusual look. Garden paths lined with corks look original. For this you will need:
- A large number of corks of different sizes and colors.
- Construction adhesive.
- Cement.
- Sand.
- Boards for formwork.
The first thing you need to do is determine the location and size of the path. It is worth applying markings according to which the traffic jams are planned to be laid out. You need to dig a trench about 10 cm deep, level the soil, and make formwork around the entire perimeter of the trench. Then pour sand halfway up. It is worth preparing the solution for pouring in advance: combine sand and cement in a ratio of 1:4, gradually adding some of the glue.
You need to pour cement onto the path in small portions and then press the plugs into it in accordance with the picture. You need to carefully monitor the depth of indentation: it should be the same, the cement should reach the top of the plug. Next, you should wait for the cement to completely harden; if there are traces of mortar left on the surface, remove it with a stiff brush. Then disassemble the formwork. A bright garden decoration is ready! If desired, the path can be supplemented with curbs.
Useful things from caps
Useful household items can also be made from plastic caps. For example, at the dacha, original curtains made from lids will look beautiful and creative. To make them you will need:

Make holes opposite each other on each lid so that the cord runs through the middle. The lowest one is attached with a knot or bead or button. All the following elements of the thread are held on it. Attach the finished thread to the rail in accordance with the picture. Continue assembling the curtain to the desired size and according to the diagram. Fasten the finished curtain in the doorway.
Another interesting idea of what can be made from bottle caps. Make a massage mat that will help cope with nervous tension received during the day. Good for foot and back massage.
You will need a lot of lids, strong fishing line and awl. First you need to choose the future rug pattern. Use an awl to make four holes in the sides of the corks, using the principle of a cross. Then lay out a pattern from them and begin to place them on the fishing line one by one. After this, the covers of the outermost row are strung on a fishing line through opposite holes. In this order, assemble all subsequent rows. Give the mat the correct shape, tighten the fishing line if necessary. Tie knots on the fishing line and set the ends on fire or break off. Using a similar method, you can make coasters for cold dishes or make a rug for the hallway.
No one is surprised when people knit clothes by hand. Although everyone knows that it is easier to buy. Plastic bottle caps are the same! It’s hard to resist the desire to decorate your cottage or garden with colorful crafts. Moreover, crafts made from caps can be useful. Below is a description of various gardening products made from plastic bottle caps.
Bright pictures of traffic jams on a barn and fence
The swan is made of corks of 4 colors, which are attached with fishing line and nailsA wide variety of colors of plastic bottle caps allows you to create almost any design. You can implement the ideas presented below, or use simple cross stitch patterns. It is especially interesting to make a new picture with your own hands. Here is a short master class on making jewelry. First, a grid is applied to the drawing on paper or a computer screen with a step corresponding to the size of the lids. Then a cork of the most suitable color is selected for each square.
 The placement of fishing line and nails is clearly visible here
 It is convenient to secure the lid elements to a wooden wall using nails and fishing line. First, two holes are pierced in the side surfaces of the plugs with an awl, opposite each other, for fishing line. Assembly is carried out in rows, starting from the bottom row. The nails are driven into the sides of the pattern so that they protrude 1cm above the mounting surface.

 A flower, a cockerel, and even a cow - everything can be depicted using corks
 The height distance between the nails corresponds to the diameter of the covers. Count the number of rows of the pattern and cut the fishing line to the required length with a margin. We tie a fishing line to one of the lowest nails and melt its end with a match to prevent it from untying. We sequentially put the plugs of the bottom row on the fishing line.
 Both the fence and the toilet will become more beautiful: our advice
 Then stretch the fishing line with the caps and tie it to the nail on the opposite side with two knots. Pass the line under the first row of plugs and tie to the nail on the opposite side with two knots. Now you can dial and fasten the second row and so on.
After assembling the entire pattern, the last knot should be protected from untying by melting the end of the fishing line with a match. You can’t hammer all the nails in at once, but only those whose location is already clear. If you drive the nails at a slant away from the design, the line will press the plugs to the base when tension is applied.

 A cat and a dog from traffic jams will always be friends
 Of course, plastic bottle caps can be secured using nails. In this case, it will be more difficult to ensure geometrically correct placement of the plugs.
It is more difficult to hammer nails into plywood than into boards.
Show your imagination and create your own drawing. Your cork creations will be able to revive an old fence and bring a smile when visiting the shower or toilet.
Funny figures made from lids in the country house and garden
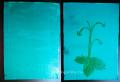
 Such flowers do not fade
 It’s no less fun to decorate figures in the garden with plastic bottle caps. They can be quite simple and require a small amount of material.
Painted plywood is a good base for fabulous flowers and animals. The covers can also be placed with the flat side facing the base of the design. This gives a unique texture to the surface of the craft, but driving nails into a small cork is not easy.

 Flowers will be bright in any weather
 It is very convenient to use a screwdriver and small screws. Please note that uneven surfaces of the design will be more difficult to clean from dirt.

 Bottle caps can be used to decorate anything
 The lids can be placed on wire and formed into a ring. We attach the ring to the disk using wire and get “Martian” sunflowers. An ordinary tree stump, decorated with corks, takes on a charming look and can be used as a seat.
Useful and original fences for plants

 Useful and fun plant fence
 The border for the flower bed can be decorated with caps from plastic bottles. To do this, they are simply pressed into the mass of cement mortar from which the curb is made.
You can use corks to create a fence that supports the branches of a plant. It is enough to pierce the lids with an awl in the center and string them on a wire. The colored hoop can be secured to wooden supports with nails.
DIY curtains made from plastic bottle caps
 Colorful cork curtains will decorate any cottage
 Original and bright curtains for the garden are another option for using plastic bottle caps. Agree, it is better to purchase a large amount of material at a wholesale base or order via the Internet.
It is convenient to attach the plugs in two rows on one line. To begin with, you need to make two holes in all the covers on opposite sides for the fishing line. The end of the fishing line is tied with two knots and melted with a match to prevent unraveling.
The caps are strung on the fishing line in the required order. After installing the covers of one row, make a mark and put on the covers of the second row in the reverse order. The end of the fishing line is tied and melted. Two rows of curtain will be attached to the middle of the fishing line, which we previously marked. In this way, the required number of rows is prepared.

 Option for curtains that are light and imaginative
 Markings are made on the frame of the doorway and nails with covers for attaching curtains are hammered in (not completely). After hanging paired rows on each nail, the latter are hammered to the end to securely fasten the fishing line.
Of course, curtains can be made translucent and require significantly less material. In this case, a double row of plugs must be hung on two adjacent nails driven in at the required intervals.
You can also make furniture from cork
 Furniture made from cork in the country is a worthy decoration
 Furniture made from plastic corks in the country looks great. The photo shows four technologies for decorating tables and chairs:
- In the photo in front of you, the entire room at the dacha is decorated with corks and plastic bottles. We already know how to make curtains. We discuss crafts for the garden made from plastic bottles in a separate article. The capes made from the covers on the chairs are assembled on a fishing line, almost like curtains. In this case, the line passes through the covers in two perpendicular directions. To do this, four holes are made in their sides. You can learn more about this technology by watching the video.
- The wooden chair shown in the photo is decorated with caps from plastic bottles using small screws. It is convenient to do the work with a screwdriver.
- The plywood table cover must first be protected from moisture with paint. It is convenient to install the covers on it using construction adhesive “liquid nails”. The chairs from this set are soft and mounted in much the same way as a rug: through four holes in the side walls. In this case, the thin fishing line will not support the weight of a person. One line of caps will carry up to 10 kg of load. So choose a fishing line for fish weighing more than 10 kg.
Colored paths at the dacha made of plastic corks

 Not a single king can walk along such a path, but you will have
 The technology for decorating a path with plastic bottle caps is quite simple. First, the formwork is installed, and a path is poured from a mixture of cement and sand in a ratio of 1 to 4. The work is carried out sequentially, in small sections.
 There can be many design options for small corks
 After carefully leveling a section of the path no more than 0.5 m long, plugs are pressed into the surface of the solution. It will not be possible to install lids in a composition that is too thick and frozen.

 Paths made of plastic corks in the country are appropriate everywhere
 You can place a flat board on a group of three rows of plugs and lightly tap on it, trimming the previously neatly aligned caps. Do not level areas that are already drying out. After the solution has completely hardened, remove the formwork and wash the surface of the path.
A fence made of plastic corks in the country - useful and beautiful
 Your neighbors definitely don’t have a fence from traffic jams
 The fence made from plastic bottle caps impresses with its scale. You definitely need to buy this amount of material. Although a simple gate on the site can be easily decorated by nailing the lids. When decorating a huge fence, I would choose liquid nails construction adhesive to attach the plugs.
The fence can be made entirely from caps. The technology is still the same: four holes in the sides of the plugs and fishing lines threaded perpendicularly. For installation, you will need a frame made of a metal pipe with a cross-section of at least 25x25mm.
A colorful panel makes an impression
 Such types pretend to be called a work
 Probably, the panels are at the same time the largest and brightest works made from plastic bottle caps. How much work and patience must be shown to make such jewelry! This could be an imitation of a famous painting, a colorful mosaic of fancy patterns, a stylized image in the form of a mosaic, or a still life of individual paintings. For those who decide to do a project of this kind, there is no point in suggesting the plot. Installation of plugs can be done using nails, fishing line, glue and self-tapping screws.

 The love of the owners of these houses for their home is respectful.
 We did a little experiment and made a simple design out of caps in 15 minutes. The following conclusion followed: creating from traffic jams is easy and simple!
Plastic or tin lids are a super versatile material for making home decorations, children's crafts and even garden furniture.
In this article, we presented 120 inspiring photos and 12 cool ideas for “deco-upcycling” caps from plastic and glass bottles with tips and master classes.
Idea 1. Placemats (+ master class)
Let's start with practice and tell you how to make these cute coasters for glasses from ordinary plastic lids.
Materials and tools:
Lids from plastic bottles (for one cup holder you will need 7 lids, and to make a large stand you will need 28 lids); Fabric in two shades of pink, as well as a piece of fabric in orange or coral color; Any glass, jar or lid, with a diameter of about 7 mm; Pencil; Needle and thread; Scissors. 
Instructions:
Step 1. On the existing scraps of fabric, draw 7 circles, tracing the outline of the tin lid, and then cut them out. 
Step 2. Now we need to cover each cap with fabric. This is done simply: run large stitches along the entire circumference of the patch, place the lid in the center of the workpiece, then pull the thread and secure the resulting “cover” with a couple of stitches. 
Step 3: Now connect all the caps one by one to make a chain. Please note that the connecting seams should be as invisible as possible. Next, roll the resulting chain into a flower (pictured) and secure it by sweeping all the parts together. Hurray, the first cup holder made from lids is ready! 
Step 4. If you want to make a teapot stand, then you just need to connect 4 cup holders to each other. 
This collection presents other ideas for coasters made from plastic and tin lids. 


Coasters for glasses made of beer corks and epoxy resin poured into a mold 
Idea 2. Children's toys (+ master class) Both plastic and tin bottle caps make cool children's toys - robots, transformers, astronauts, iron men and animal figures.
Here is a selection of photo ideas for crafts made from plastic bottle caps. 


In this photo you can see the astronaut's design
Here are examples of crafts made from metal lids. 


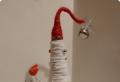
And now we’ll tell you how to make a rattlesnake out of plastic caps with your own hands that will rattle in the literal sense of the word!  Bottle cap craft
Materials and tools:
Caps for bottles of different sizes (in this master class it took 33 caps to create a snake); Soldering iron or awl; Gold spray paint or regular acrylic paint (it takes a little longer to work with, but you can keep your child busy with painting); Leg-split; Hot glue gun; 2 dark beads (for eyes); Brown permanent marker (optional). How to make a rattlesnake from plastic caps:
Step 1: Collect caps from bottles of different sizes and sort them by size.
Step 2. Using an awl or soldering iron, make a hole in the center of each lid. Of course, this stage of work must be done by the parent. 
Step 3: Spray paint the lids or paint them with a brush. 
Step 4: Start stringing the lids onto the twine in pairs with the open side facing each other (see photo below), starting with pairs of large lids and ending with pairs of small lids. Finally, when all pairs of caps are strung, make the snake's face - put the smallest cap on the beginning of the workpiece (that is, on the first pair of large caps). Note that the inside of the muzzle cap should face the outside of the first large cap. By the way, this stage can and should be done together with the children.
Step 5: Align the snake and tie knots tightly at both ends. On the tail, the tip of the twine should be completely cut off and filled with hot glue (see photo below), and on the muzzle, leave a tip of about 1.5 cm.
Step 6. Now we need to make the snake's tongue. To do this, cut two identical small and narrow strips of black felt, then cut a sharp triangle at one end of each strip. This stage of work can be entrusted to a child.
Step 7. Glue the two parts of the tongue around the tip of the twine remaining on the lid-muzzle (it is advisable to hide the knot between the strips of felt).
Step 8. Glue two eye beads.
Step 9. The craft is ready, all that remains is to bring it to perfection by drawing small spots on the snake’s body with a marker or paint. 
Idea 3. Wall panels and paintings Since tin and plastic caps from bottles and cans are similar to mosaic parts, you can use them to make wall panels and even completely decorate the walls. The principle of making wall panels is simple: first, a color scheme of the design is drawn up on checkered paper, then the covers are sorted and painted in the right colors and in the right quantity. Next, markings are applied to the base and then the lids are glued with hot glue or superglue according to the diagram.
As a pattern for a panel of lids, you can use a pattern for beading, embroidery or mosaic. 
Below are photo ideas for crafts made from beer caps.
Panel made from glass bottle caps 
Panel with inserted beer caps
When composing panels, plastic lids allow you to play not only with their color, but also with sizes, as well as combinations of lids stacked on top of each other (see photo). 


Picture made from plastic caps  New Year's panel made from plastic bottle caps
Here are examples of exterior decoration and wall decor made from plastic bottle caps.
And finally, examples of children's crafts and appliques made from plastic caps. 


Idea 4. New Year's crafts (+ master class) Tin and plastic bottle caps make beautiful New Year's crafts: wreaths, mini-Christmas trees, garlands, gift tags and, of course, Christmas tree decorations. 
New Year's crafts from plastic lids 
Christmas tree toy-snowman made of plastic caps 

Christmas crafts from lids
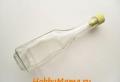
Christmas decorations made from caps Gift tag made from a beer cap Now we suggest moving on to practice and making your own crafts from glass bottle caps in the form of pasta like this. 
Crafts from glass bottle caps in the form of pasta 
Materials and tools:
Spray paint cans in pastel colors (you can also use paint in cans); Gold cord or braid; Hot glue gun; Tin lids (smooth lids are best, but slightly bent ones will also work); Glitter. 
Step 1: The first thing you need to do is separate the lids into groups with an even number of stoppers, and then paint each group the colors you want. 
Step 2. Once all the corks are dry, start making your first pendant. To do this, tie a small piece of cord into a loop, then glue its base to the inside of the lid and, finally, glue the second lid on top (see photo). Be careful not to put too much glue to avoid excess glue getting between the lids. 
Step 3. This step will require hand speed and precision, as hot glue hardens very quickly. Take your piece and apply a little glue where the lids meet, then quickly drop it into the glitter jar. Continue covering the center of the macaron with glue and glitter little by little until you're done. Voila! The first macaron is ready, now all you have to do is finish the rest of the pies and then hang them on the tree. However, these crafts are quite versatile. For example, you can use them to make a garland or refrigerator magnets, or you can also pack them in a box like real pasta and give them to a lover of sweets. 

Idea 5. Decorations for the garden and vegetable garden By adding crafts made from lids with a stick, you will get a cool garden decor for your dacha or just a decoration for a flower pot. 
Crafts from lids for the garden 
Crafts from lids for the garden 
Crafts from lids for the garden
Metal lids make great flowers. 


It is very easy to make such flowers with your own hands: the lids are clamped with pliers, then glued to a base (for example, a lid from a tin can) and finally a stem (a wooden skewer or other stick) is glued to the craft. If desired, you can glue a couple of petals from green caps to the stem.
Idea 6. Magnets To find out how to make refrigerator magnets out of lids with your own hands, take a look at the article with detailed instructions.  These Photo Frame Magnets are Made from Nutella Caps

These crafts are made from baby food jar lids.


Idea 7. Jewelry and accessories You can make beautiful necklaces and brooches from plastic lids upholstered in soft but dense fabric.
Necklace made from plastic bottle caps 
Reverse side of cap necklace
Tin lids make beautiful earrings, medallions, necklaces, keychains, brooches and even rings.
Have you noticed that in some photos the lids look a little different - they don’t have a sharp “crown”, but have a recess inside? Modifying lids in this way is very easy with just a rubber mallet and a solid platform. Place the lid face up on the platform, now hit the center of the lid firmly with a hammer. 
Next, continue to hit the center of the cork with a hammer, turning it periodically to bend the metal evenly. Finally, turn the cork over and see what happens. 

Idea 8. Furniture: Almost any piece of furniture can be covered with tin lids. 


Plastic covers can make excellent garden chairs, tables, and benches. 


You can even make storage boxes from plastic lids. 
Idea 9. Serving tray Decorating a boring serving tray with lids is very simple: carefully place all the plugs on the bottom, then fill them with a layer of epoxy resin and leave the craft to dry for at least a day. The main thing here is to mix the resin with the hardener according to the manufacturer's instructions (to the nearest gram!) and pour it slowly, avoiding the formation of bubbles. If you want a perfectly transparent resin layer, use liquid epoxy resin for decorative rather than construction purposes. 


Idea 10. Door curtain If you have accumulated a lot of plastic covers, you can “sew” them into a door curtain for your cottage. The easiest way is to string caps of different sizes and colors on threads in a chaotic order (see photo). 
If you want the curtain to have a pattern, then you need to search the Internet for patterns for making curtains from beads. 
 Idea 11. Wall clock Both tin and plastic covers can replace the numbers on a wall clock. All you need is a clock mechanism (can be removed from an old clock), a base, 12 caps and our step-by-step instructions on how to make your own clock.
Here are some photo examples of what a homemade clock made from lids can look like. 


Idea 12. Frames for photos or mirrors Beer caps are best suited for decorating mirrors and photo frames.
If the mirror does not have a frame, then it can be decorated with assorted beer caps. 

Related posts:
 DIY New Year's candlestick from a glass How to decorate New Year's wine glasses and candlesticks with polystyrene foam
 Tips for making birch from curled paper Birch branch from quilling country of craftsmen
 DIY New Year's toys: crafts from plastic caps Toys from plastic bottle caps
 DIY glass painting for beginners and experienced decorators Other methods and secrets of glass painting: how to dry a glass with a painted stem and use a stencil or sketch
 I’ll eat the nut and collect the shell in a bag to create a real miracle... Crafts made from nut shells for children


