Passepartout - what it is, how to make it yourself from cardboard, varieties and color selection. Homemade passe-partout for the design of your works Step-by-step production of passe-partout goal
Even the most beautiful and exquisite painting without the appropriate design and correctly selected frame will look poor and completely out of place. Therefore, the craftsmen and needlewomen who create masterpieces, at the end of the work, are faced with the question of how to make a mat for a painting with their own hands. Of course, you can take your creation to a framing workshop, but this option is not cheap and many will simply not afford it. That’s why the ideal solution is to figure out how to do it yourself.
What is a passe-partout and what is it for?
A passe-partout is a special cardboard frame with an oval, round or rectangular hole into which a painting, photograph or any other work is inserted. This type of frame is perfect for drawing or embroidery. The main task of the mat is to create harmony between the frame, the painting and the overall design of the room in which the work will be located. Using this design, you can focus attention on the center of the composition and harmoniously fit it into the interior.
A passe-partout will be a great way to highlight a painting on the wall, especially if the color of the wall covering and the image match. For example, if you want to hang a photo or picture of a forest in shades of green, and the wallpaper on the walls of the room is light green, a mat of some contrasting color will be the ideal solution in this case.
When creating a mat with your own hands, you can leave as much free space around the painting as you deem necessary in order to maximize the focus on the painting itself.
Important! By the way, you can place a famous quote or author’s signature in this free space.
Another important advantage of mat is its versatility - it is suitable for paintings or photographs of absolutely any size.
What is needed for production?
In order to make a mat for a painting, you need to stock up on the following materials and tools:
- Colored thick paper of the required color.
- Whatman paper or cardboard.
- A simple pencil.
- Scissors.
- Any glue.
- Ruler.
- Metal corner.
Master class on creating a passe-partout
Making a passe-partout for a photo or picture yourself will require some effort and patience from you, however, people with any level of skill can handle this work. The step-by-step creation scheme roughly looks like this:
- Take a sheet of thick cardboard and draw a rectangle on it. Its dimensions should be twice the size of the finished drawing or painting for which the mat is made. Cut out this rectangle and place it in the center of the picture so that the distance from the sides of the picture to the edges of the frame is the same. Next, outline the drawing or picture with a simple pencil and cut out the resulting rectangle. As a result, you should get a kind of frame with a window in the middle. Set this detail aside for now.
- The next step is to make a contrasting color edging. To do this, take colored paper and cut out four strips of equal width - approximately 3 cm. The first pair of strips should be equal in size to the width of the window, the second to the length. Then bend the resulting strips in half lengthwise, leaving a narrow edge no more than 2 mm wide.
- Place the strips on the inner window and check if they fit. Using a metal triangle, measure out the excess corners and then cut them off.
- Now you need to glue the strips into the frame itself. Glue should only be applied to cardboard, because colored paper is thinner and can stretch and swell, resulting in unsightly bumps.
Important! Pay special attention to the joints at the corners of the frame.
- When the glue is completely dry, you can attach a picture or drawing to the back side and frame the finished work with or without glass.
Important! It is worth noting the peculiarity of the design of the embroidered work in the passe-partout. It must be fixed on a sheet of thick cardboard using a stapler or tape, and only after that decorate the passe-partout with a frame.
Small tricks that will make the mat a masterpiece:
- When choosing the width of the mat, you need to take into account the fact that small images look more impressive in narrow frames, and bright and large ones - in wide ones.
- The passe-partout should be twice as wide as the frame.
- In order for the picture and mat to fit freely in the frame, they should be made 3 mm smaller on all sides than the dimensions of the frame itself.
- For a romantic picture, the mat can be decorated with ribbons, lace or dried flowers - this will add even more charm to the work.
- A passe-partout for children's drawings can be decorated with a variety of badges, buttons, mini-toys and other cute things.
Important! Mats made from fabric look very original. They add special warmth and comfort to the interior.
No matter how beautiful and unique a painting may be, it can be ruined by a completely inappropriate and incorrectly selected frame. Beginners and experienced needlewomen very often face the question of beautiful and correctly selected design of a completed handmade work. The simplest and most affordable solution to this complex and important issue will be to create a passe-partout with your own hands to decorate the finished product.
Of course, now you can easily purchase a wide variety of frames in specialized stores. However, you will not always be able to find exactly what you saw in your imagination and idea of your product. In such cases, you will need to put in very little effort and spend a little of your time and create a passe-partout and a picture frame with your own hands.

When decorating paintings made of fabric or beads, it is very important to correctly and organically fit the mat into the finished work. The role of mat as a decorative element cannot be overestimated. Making your own mat allows you to give a photograph or embroidery a sense of space, leaving as much free space around the perimeter as is necessary to indicate an accent, place a corporate signature or text inscription. In addition, you do not have to “adjust” the dimensions of the work to fit the mat, because it, in fact, has universal dimensions and characteristics.
We study some aspects and rules for creating a passe-partout with your own hands
If you decide to make your own passe-partout, for example, from cardboard, you should know and take into account the following features and rules:
- When choosing the width of the frame you like, you need to take into account the fact that small images and paintings look more beautiful in narrow frames.
- The backing for your mat should be chosen according to its texture and color scheme in such a way as to complement and enhance the finished work without distracting attention from it. If you want to add a sense of depth to your piece, create a double mat. Often, the color of the outer mat reflects the main color of the work, while the color scheme of the inner one focuses attention on interesting details. All sides of your mat can be the same width, or the bottom edge can be twelve centimeters wider than the other three pieces. In order to determine the width of the decorative mat that suits you, you can experiment with strips of paper.
- To freely place the mat and backing cardboard in the frame, shape them three millimeters smaller than the size of the sides of the inner frame of your work.
- Opt for a hard backing layer of cardboard or plywood to avoid warping of the finished painting.
- The frame must support the entire glass and have enough depth to accommodate the cardboard backing and mat.
- The outer side of the inner mat should be six millimeters smaller than the outer sides of the outer mat.

We bring to your attention a detailed master class on making a mat for an embroidered painting or photograph. To work you will need the following materials and tools:
- Sheets of cardboard;
- Colored thick paper;
- Sharp scissors;
- Ruler;
- Metal corner;
- PVA glue.
Start making a passe-partout. On a piece of thick cardboard, draw a rectangle whose dimensions are twice as large as the dimensions of the finished product that you want to place on the passe-partout. The distance to the edges of the frame should be the same. Then carefully trace the photo or drawing with a pencil, remove the work and, stepping back from the edge just a millimeter or two, cut out a rectangle. You should end up with a cardboard rectangle with a window cut out in the center.

Now you can start gluing the strips to the cardboard frame. Carefully glue the strips, paying special attention to the joints at the corners.
When the glue has dried, you can place a drawing or photo on the back of the passport, and then decorate the finished work with a frame (with or without glass, it’s up to you). If you plan to place embroidery on a passe-partout, you must first attach it to a sheet of thick cardboard, securing the fabric on the back side with double-sided tape or a small stapler.
Thematic video on the topic of the article
We bring to your attention a selection of interesting videos on the topic of this article. We hope you find it interesting and useful. Enjoy watching.
Tatyana Kerbo
Hello, friends. Many people are faced with the problem of how to decorate a children's creativity corner. I want to tell you about a simple and budget-friendly way to make frames for children's drawings or photographs. I made these in my group frames in two formats: for kids A5 (half a landscape sheet, for older preschoolers A4 (landscape or standard copy sheet) It’s labor-intensive to do for the whole group at once, so I advise you to involve parents. You can organize a joint master- class Children will draw, and parents will make frames for them drawings!

For work you will need: a piece of wallpaper, cardboard, glue, a large ruler, scissors.

Apply drawing(sheet of paper of the required size) for wallpaper

Trace along the contour with a pencil or felt-tip pen. If you are making a large number of frames, you can use a sheet of cardboard, then you can draw the sheet without a ruler.

We remove the template and draw another smaller one inside the rectangle (we deviate from the original one by about 1 cm, we also need to draw diagonals in the inner rectangle

Then you need to cut the wallpaper diagonally from the center to the corners (not reaching the larger rectangle).


Then bend the resulting triangles


We bend the outer part of the wallpaper, trying to ensure that the resulting sides of the frame are the same in width, and glue it.


All that remains is to glue the backdrop. I use cardboard from packages of colored paper sets. Then in the finished frame, even if it is empty, you can see a cute drawing. You can use cardboard from regular boxes. Then the frame will be very rigid.. Important: We apply glue on three sides so that you can change works. In the center around the hole for drawing Apply strips of glue on the long and short sides. They are needed to the drawing is not"fell through" inside the finished framework. I showed the gluing lines with a marker. If it’s hard to see, I duplicated it in the center on a napkin

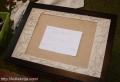
IMG]/upload/blogs/6bc1a82914e9567de04fa91f93f407bb.jpg.jpg That's it. The house for your masterpiece is ready!


You can glue a loop of braid at the back and attach frame with a picture straight to the wallpaper using a simple sewing pin. In our locker room we use ceiling plastic cornices as shelves.
A passe-partout is a cardboard figure, usually a rectangle, square or oval. It is often used in two ways: a photograph is glued to the center or a small frame is made in the middle - a hole into which a painting, photograph or embroidery is inserted. This hole should be in harmony in shape with the content of the image, the shape and color of the frame. The passe-partout fills the space between the frame and the picture. In this article we will figure out how to make a passe-partout with your own hands.
Vintage but modern
Where and when did it come from? It is unlikely that it will be possible to name the exact date and creator. If we talk about the history of its origin, all that is known is that this art has come to us since the time of Leonardo da Vinci. It was he who first began to protect his paintings with frames, approaching this issue with the utmost seriousness.
Depending on what the mat will frame, its tasks can be completely different. If, for example, it is used for a photo, then this can significantly expand the perception of the image. It also performs an informative function; it records when, who or what is shown in the photo. Sometimes the passe-partout contains the autograph of the person depicted in the photograph.


An important function of a passe-partout is protection. Thanks to the mat, the photo, embroidery or painting is located at a short distance from the glass, which protects it from deformation for a long period of time.

Decorative function. This is the main reason why it generally makes sense to arrange embroidery or a painting in a passe-partout. Depending on the material from which it is composed, a mat can create a variety of visual effects: increase the depth of the image, create a color balance between the work itself and the frame. In the photo below you can see how the perception of the image changes depending on the color of the mat.


You can make a mat for your painting or embroidery with your own hands using simple materials and tools, as described in the master class below.
You will need:
- cardboard in a color that will highlight the beauty of your image and match the frame;
- white or plain cardboard;
- paper knife;
- scissors;
- glue;
- your painting (embroidery, photo).
Cut a piece of cardboard equal in size to our work. Mark it, determining the center of the embroidery and mat, draw a rectangle of the required size on the cardboard. Measure 2 mm from each line and draw two more rectangles - larger and smaller than the size of the first rectangle, equal to the size of the embroidery.


Now use a paper knife to cut a line along an iron ruler along the internal markings, and with the blunt side of scissors or something not too sharp, press the line along the external markings. In each corner you need to make small cuts from one corner to the other and bend them inside the resulting fields.

Typically, a frame consists of three parts: glass, the frame itself, and the back part, which holds the picture in place. It is to the back of the picture that you need to attach the embroidery with double-sided tape or a stapler.

To make the mat more voluminous, you will need to cut strips of white or plain cardboard and glue them around the perimeter from the inside out, as in the photo.

Assemble the embroidery with the finished mat: first the frame, then the glass, then the mat, then the embroidery attached to the back wall.

The picture with the mat is ready.

This design option will look very good and will cost you very little.
In framing workshops there are various types of mats, different in color, texture, composition and decor. These are professional products, and they are made on special equipment. There are mats with decorative embossing or engraving.
Depending on the number of layers of cardboard, there is a single-layer (for modern graphics) and multi-layer mat (to create the effect of depth).


If you are engaged in professional activities and create expensive works, then you need to understand that, based on their composition, they distinguish between museum, reservation and ordinary mats.
Museum passe-partout: made of special cotton fibers, without chemicals that can spoil the work framed in it over time. Used for valuable exhibits or expensive photographs or paintings.

Reservation mat: made of sawdust, with cotton fibers. Contains a small amount of chemicals that maintain the desired acidity level for a long period of time.
Standard passe-partout: made of cardboard. Such a mat has only a decorative function, without protecting the work from environmental influences.


Since mats with embossing and texture are very expensive, lovers of scrapbooking or embroidery use different materials to create mats, for example, they make it from fabric or paper for decorating gifts. Some even use pieces of wallpaper to create beautiful mats.

DIY passe-partout. Master class with step-by-step photos
Master class on making mats for children's work
The master class is designed for primary school teachers, fine arts teachers, organizers of children's movements, teachers of additional education, heads of clubs, methodologists, creative people involved in organizing exhibitions of children's works.
Tasks:
- teach techniques for making mats
- develop creative imagination, constructive thinking;
- instill the ability to see beauty;
- cultivate accuracy when performing work;
- receive a positive charge from work..
You will need:
1.A-4 paper
2. Ruler
3.Scissors
4. Children's work
5. Portrait from a magazine
6.Postcard

Passepartout (French passe partout) is a piece of cardboard or paper with a quadrangular, oval or round hole cut out in the middle for a frame into which a photograph, drawing or engraving is inserted. This allows you to more freely select the frame size to match the image size.
Passepartout for children's works contributes to the aesthetic perception of works and instills this taste in children. It should be noted that a mat for students’ work helps to coordinate the image with the wall or stand where the work will be placed.
1. We begin the work of making a passe-partout by marking it on a sheet of A-4 paper. Take a sheet of paper, a ruler and a pencil. Stepping back from the corners by 2 cm, we place points, then we connect these points using a ruler.

By connecting the marked points, we get a rectangle.

2. Connect the opposite corners of the resulting rectangle diagonally.

3. We make a slot in the center and bring the cuts to the corners of the rectangle diagonally.

A rectangle cut diagonally will look like this:

4.Using a ruler, sequentially bend the cut parts outward.


Turning over the sheet with the folded parts we will see the following frame:

Turning the passe-partout over again, we carefully place the student’s work.

5.Then we bend all 4 parts sequentially along the outer contour of the children's work.
6. Carefully turn it over and see the result of your work.

You can place children's works, portraits, illustrations from color magazines, and postcards in the mat. They will have a pleasant aesthetic appearance. Thus, we develop aesthetic taste, accuracy, and respect for the work of our friends.

In this way you can decorate any illustration, portrait from a glossy magazine, giving it a pleasant aesthetic look. For example, how can you ennoble the portrait of the world's first cosmonaut Yu.A. Gagarin.


In such mats, children's drawings look like the work of real artists.
Related posts:
 Homemade passe-partout for the design of your works Step-by-step production of passe-partout goal
 Water stickers for nails from AliExpress: how to apply
 Interesting DIY things
 Master class on creating topiary from artificial flowers Do-it-yourself topiary trees step-by-step instructions
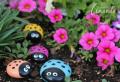 Crafts made from stones: amazing ideas and original solutions for using stones (90 photos)


