Learning to draw trees. How to draw a beautiful tree Step by step drawing of a tree
Trees may seem like some of the easiest subjects to draw. If you have never drawn, the task may be too simple...

...or too literal:

In none of the drawings do we see anything similar to real objects. The first is just a symbol of a tree, and the second suggests the definition of a tree. Your job as an artist is to paint what we see, not what we know. Drawing trees– a great exercise for developing this skill!
In this lesson I will show you, how to draw oak, pine and weeping willow trees in a simple and realistic way.
What you will need:
- Several sheets of paper;
— Hard pencil (HB);
— Pencil of medium softness (2B);
— Soft pencil (5B or less);
- Sharpener.
Usually a pair of hard pencils (HB) is enough, but this set is not universal for all drawings. To get dark shadows, we need soft pencils. There is no need to choose expensive ones - I bought the most common ones, and they perform their function perfectly. If you doubt whether you need to draw, then a set of pencils of different degrees of hardness will not be a big loss on your budget, and drawing with these is much easier!
You will also need a sharpener. A dull tip leaves lighter strokes and does not achieve the expected effect. Always keep your pencils sharp and remember that soft pencils wear out faster!
Regarding paper: it can be anything. Regular printer paper will also work. However, you should not draw on a whole sheet of paper - the smaller the drawing, the less detail you will need to add. In reality, my drawings are about 9 cm in height.

Soft pencils help make shadows darker, which cannot be said about hard pencils. Hard pencils are not as dark, even if you press hard on them!
- DRAWING AN OAK
Step 1
The brain works in an unusual way: it first grasps the big picture and then pays attention to the details. Therefore, you should not start drawing with details - you will need to create a base first.
Draw the general shape of the tree with a few faint strokes and dots. To do this, use a hard (HB) pencil, do not press on it. These strokes will not be part of the finished image - they will not be visible in the finished drawing; The camera and scanner don't recognize them (I used Photoshop so you can see them!).


Step 2
Draw the trunk. Don't forget - the lower part should expand downwards. The larger the tree, the shorter and thicker its trunk.


Step 3
Draw the branches at the top of the trunk.


Continue drawing the branches, gradually lowering the line as they lengthen.

Step 4
Add other branches to each branch (the longer, the lower they go). The strokes should be light.


Step 5
Using short, sharp strokes, draw the shape of the tree's crown. It doesn't have to be smooth and neat.

Step 6
Using the same method, draw small “clouds” of leaves inside the crown. Leave some areas empty so that parts of the branches are visible - this structure looks more interesting.


Step 7
Add thickness to the branches in places where they are not covered by leaves.


Step 8
Before you start applying shadows, determine which parts of the tree will be bright and which parts will have shadows. You can identify them by simple shading.


Step 9
Take a soft (2B) pencil (make sure it's sharp) and create texture on the trunk. Remember to also leave white areas - this is important for texture.

Step 10
Take soft pencils (2B and 5B) and darken the barrel according to the original light distribution plan. Don't be afraid to press down on the soft pencil to get the shadow you want, but don't overdo it either! The fewer black areas in the picture, the more impressive it looks.


Step 11
Take a hard pencil and sketch out the outlines of the leaves. Draw them in relaxed circles, quickly, with sharp movements.


Step 12
Each branch also has its own small crown (these are the “clouds” that you drew). They need to be shaded in the same way as if they were separate trees.
First, use a soft (2B) pencil to draw darker circles on the dark side. Don't press too hard at first so you can correct any mistakes.


Once you're sure you've got the dark sides right, add shadows and depth to them, and add some transition between the light and dark parts.


Step 13
Use a soft (2B) pencil to add some stray leaves throughout the crown and "little crowns." This will create the effect of additional, barely visible branches.


Step 14
Take the softest pencil and add some dark accents in the darkest places. The crown will be more contrasting. Also make sure that all leaves are darker than the “sky” background - leaves cannot be transparent! You can go over the lightest areas again with a hard pencil.

- DRAWING A PINE
Step 1
Again, we start drawing with the general outline of the tree. Take a hard pencil and draw light lines.

Step 2
Draw the branches. Don't try to get them exactly right, just sketch them out.


Step 3
As with the oak tree, draw “clouds” on the branches. This time they should be narrower and even more uneven. Leave plenty of free space between them.


Step 4
Draw the outline of the trunk - long and narrow.


Step 5
Use a soft (2B) pencil to darken the barrel...

...and then a softer pencil to highlight the darkest side.

Step 6
This time there is no need to fill in the “clouds” with circles; fill them instead with sharp and chaotic strokes.


Step 7
Use a soft (2B) pencil to draw needles along the outline of the clouds. They should be thin and sharp.


Step 8
Draw the branches and darken them with two soft pencils.


Step 9
Draw even more needles inside the “clouds” with a soft (2B) pencil).

Step 10
Use the softest pencil to darken the clouds. If you want, you can simply darken them completely - evergreen trees are usually dark themselves.


Step 11
Finally, use your softest pencil to draw in the completely dark “clouds” between the branches.


- DRAWING A WEEPING WILLOW
Step 1
We will draw according to the same scheme. Let's draw a general outline of the willow - something like a fountain.


Step 2
Draw the outline of the trunk.

Step 3
Draw the branches away from the trunk...


... descending with length.


Step 4
Draw the outlines of the “clouds”; this time they will look more like curtains.

Step 5
Fill in the trunk and branches with shading using a soft (2B) pencil.

Step 6
Darken the trunk and branches with the softest pencil.

Step 7
Take a soft (2B) pencil and draw ribbon-like lines along the “curtains”. They should form an arc at the very beginning.


Step 8
Darken the "curtains" with darker and wider curling lines in the spaces.


Step 9
Use your softest pencil to draw dark “curtains” on the other, darkened side of the tree. You can also add leaves to the branches to make them more detailed.

Your trees are ready!
As you can see, draw trees- an easy task; you just need to convey their appearance, not their definition. However, this is just the beginning of learning - if you want to become a real professional in drawing trees, take a notepad with you on your walk. Observe the trees you pass by and try to make quick sketches of them. This way you can develop intuitive drawing. If you prefer to stay at home, look at photos of trees on the Internet.
Translation of an article from design.tutsplus.com.
There is a wide variety of trees in nature, as well as a wide variety of animals or birds. All this huge variety is classified according to different criteria. But for the artist, the features of the appearance of the tree are important. And in order to learn how to draw it, you need to observe the shape of the trunk, the shape of the branches, leaves, and the shape of the entire crown of the tree. After all, each breed has its own characteristics. Therefore, we will discuss these features in 6 types of trees - maple, birch, pine, spruce, willow and oak (but I recommend reading first).
Maple.
- The maple trunk can bend and branch, which gives it a sinuous shape.
- The bark is dark in color and generally similar to the bark of most trees.
- The top of the crown of this tree is rounded, but may also have an irregular shape.
- The maple leaf is known to have a pointed shape, similar to a star. Large masses of maple leaves create a “spiky” texture of the crown surface.
- When shading the crown, you can also use longitudinal strokes, but to show the character of maple foliage, it is better to add a “clumsy” or “prickly” textured stroke to the drawing, similar to maple leaves (I wrote about the texture of shading). The same principle should be followed in painting, painting the canvas with strokes that would create the illusion of foliage. Considering that leaves and branches are combined into separate groups, the texture of shading and painterly strokes should be varied.
Birch

- Birch comes in different varieties. In the middle zone, the trunk of birches is usually straight and “slender”. In other areas, a birch trunk can form a “slingshot”, bifurcating at the root.
- The crown of a birch often has an elongated shape, directed upward. However, there are also birches with a spreading, squat crown.
- Birch bark is white on the surface. But it has dark “strokes”, which are essentially cracks through which the dark inner layer is visible. The closer to the ground, the more often these “strokes” appear on the bark. “Black lines” are present on the trunk at the base of the branches, i.e. in those places of the trunk from where the branches grow. They can have a triangular or rectilinear shape.
- Small birch branches are so thin and flexible that they hang down, rushing down. The leaves growing on these branches form vertically directed rows. The branches bending towards the ground bend, giving the appearance of birches a special awe and lightness.
- In pencil drawing or painting, the graceful character of birch trees can be conveyed by longitudinal vertical shading or appropriate strokes of paint. Pencil movements or brush movements can follow the movement of the branches described above.
Pine

- The pine trunk is straight. However, there are pine trees with a trunk that bends at the top and have a “stocky” character. Often there are ship pines in which the crown is located at the top of the tree, and the trunk is straight and tall.
- The bark of this tree has a red color, which, as it approaches the ground, becomes much darker, turning into gray-brown. In the middle of the trunk, the pine bark resembles a flaky, scaly structure. Closer to the ground it becomes coarser and forms a dense, cracking layer.
- The crown of young pines has a triangular, cone-shaped shape. But the crown of mature trees will already be more rounded.
- The branches of perennial old pine trees can be twisted and gnarled. As a rule, pine branches do not point very upward. To a greater extent they are directed to the sides of the trunk.
- Pine needles are longer than spruce needles. Therefore, they create the feeling of a fluffy crown, which needs to be displayed by graphic means, or painting techniques, if this is not a drawing, but a painting. It is necessary to use a textured stroke or appropriate strokes in painting. Each branch has light and shadow, so the artist needs to think about how to draw the volume of individual branches in the overall mass of the crown.

- Spruce and pine have much in common, but they are different trees with their own characteristics. For example, if the trunk of a spruce tree is as straight as that of a pine tree, then the nature of the branches will already differ from the nature of pine branches. The branches of the spruce are slightly curved upward. In the lower tiers, the old branches are lowered down and resemble “paws”.
- Spruce needles are shorter than pine needles, so the overall texture of the crown of this tree will differ from that of pine.
- The crown of the spruce tree is shaped like a triangle or a cone and consists of tiers.
- When an artist paints a landscape, he paints trees in volume. To do this, you need to monitor how the entire tree is illuminated and how individual branches or tiers of branches are illuminated. For example, going inside the crown, the spruce “paw” plunges into the shadow. From the outside, it can remain light because it receives more daylight.
- The color of spruce needles is dark and rich. Therefore, both individual spruce trees and the spruce forest as a whole will differ in color from other types of trees.

- Willow trees can look different depending on the variety. For example, the weeping willow has branches that are more flexible and flexible than the common willow. Because of this, its branches hang down, rushing to the ground.
- Willow is characterized by constant branching of the trunk, as well as large branches.
- Willow leaves are narrow and oblong. This greatly affects the appearance of the tree. Therefore, this feature must be reflected through shading or brushwork in painting.
- The color of willow foliage is complex. On one side of the leaf the color is green. And on the other - light, gray-green. Therefore, the overall color of the tree is distinguished by gray-blue shades.
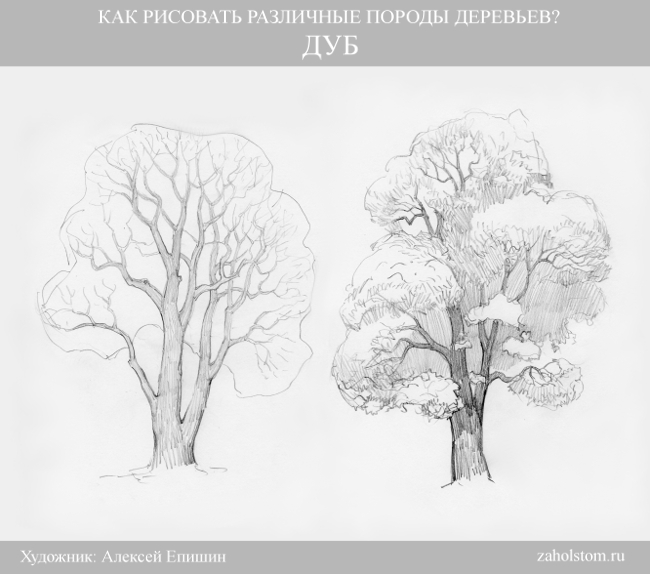
- The oak trunk is powerful. In old trees it can reach a large diameter at the base. But in dry areas, oaks can be less stocky, looking like slender young oaks.
- The branches and trunk of the oak tree are twisted and gnarled.
- The shape of the leaves is wavy. Therefore, the general appearance of the foliage as a whole will be “clumsy-curly.”
- The bark is rough and dense.
- The foliage color is dark green, rich.
Here I looked at the appearance features of only six varieties of trees. In nature there are a huge variety of trees and other plants. How can you learn to draw, if not all of them, then at least a couple of dozen varieties? To do this you need to develop observation skills. If an artist has a good eye and good powers of observation, then it doesn’t matter what he draws. The main thing is to understand nature and notice key points. And what points you need to pay attention to are discussed in the training material. For those who want to learn how to draw landscapes with trees well, it will also be useful to study the diagrams and technique called (I mentioned it at the beginning of this article).
This is an average difficulty lesson. It can be difficult for adults to repeat this lesson, so I don’t recommend drawing a tree using this lesson for young children, but if you really want to, you can try. I also want to note the lesson “” - be sure to try it again if you still have time and desire to draw today.
What you will need
In order to draw a tree we may need:
- Graphic editor GIMP. You need to download GIMP for Win or Mac OS and install it.
- Download brushes for GIMP, they may come in handy.
- Some add-ons may be needed (instructions on how to install them).
- A little patience.
- Good mood.
Step by step lesson
True nature in all its beauty can only be revealed if you draw it from life. It will be much better to draw if you look directly at the tree. If this is not possible, then ordinary photographs, which are simply in abundance in search engines, can help out.
By the way, in addition to this lesson, I advise you to pay attention to the lesson “”. It will help improve your skill or just give you a little fun.
Tip: Perform different actions on different layers. The more layers you make, the easier it will be for you to manage the drawing. So the sketch can be made on the bottom layer, and the white version on the top, and when the sketch is not needed, you can simply turn off the visibility of this layer.
As you complete this tutorial, please note that due to differences in software versions, some menu items and tools may have different names or be missing altogether. This may make the tutorial a little difficult, but I think you can do it.
Each of us should be able to depict a part of living nature. Wood is an integral part of any... In order to draw any tree correctly and realistically, the first thing you need to do is find a model. Today I will tell you how to draw a beautiful tree in a clearing step by step.
First, you need to outline the general outline of the future tree, schematically mark the trunk and crown on a transparent layer.
After you have symbolically depicted the parts of the tree, outline the contours of the branches, the so-called “skeleton”. Again, create a new layer and work on it.

All trees have a crown and our task is to depict it correctly. At this stage, mark the full volume of the crown.

When drawing a tree, remember one detail: the lower ones are always thick and large. This is how they should be portrayed. The sketch layer can be either deleted or disabled using the icon to the left of it.

At this stage you need to draw the branch from bottom to top. The upper branches are much shorter and smaller than those below. Use short strokes with a thin brush and low opacity.

The tree trunk needs to be covered with realistic bark; for this you can also use an additional layer.

At this stage, each branch needs to be “dressed” with leaves.

To prevent your tree from being lonely and standing in the air, attach it to, draw flowers and grass.

It's time to add volume. After creating a new layer, increase the size of the brush and lower its opacity. The bark of the tree differs from the overall picture; it should be darker. Remember its texture, convey roughness using shading.

We begin to cover the left part of the crown with light shading (you just need to lower the opacity of the brush).

We move on to shading the right side and draw leaves on it.

On a new layer, by changing the opacity of the brush, show the color transitions; this technology will help convey the volume of the tree.

We will draw on a new layer. There is no need to draw each leaf in detail; it is enough to outline them schematically. Play with the size and opacity of the whale.

Particular attention should be paid to the shadows and light of the picture. Try to convey all the features of the tree. You should already have enough layers in your palette, work on them.

At the last stage, we will paint the highlights using a white brush. This will give the tree a realistic look.

With these simple steps we arrived at the finale and got a beautiful drawing.
So you learned how to draw a tree, I hope it was interesting and informative. Now you can pay attention to the lesson “” - it is just as interesting and exciting. Share this lesson with your friends on social media. networks.
Almost always, when drawing any landscape, a tree appears as the main or additional object, and sometimes even more than one. Before you start drawing an entire grove or even a forest, you need to learn how to draw a single tree, and also practice drawing different types of trees.
In this tutorial I want to demonstrate how to paint different types of trees using different techniques. It is very important that the paints are of good quality. Using low-quality paints will make it difficult for you to control your work with paint, and in general the whole process will not bring much pleasure, and the result will most likely be extremely mediocre.
So, I will show you how to paint a winter spruce, a deciduous tree, and also a technique for painting a tree with a sponge. Let's start.
How to paint a spruce with paints
First, let's designate the trunk. It shows in which direction the side branches grow. Important - if you paint not with gouache, but with watercolor, then you will need to make a preliminary sketch with a pencil and start painting from the light areas, then wait until the paint dries and move on to the dark details. If you don't do this, all the paint will mix and you'll end up with a very messy, unsightly painting. By the way, here is a detailed description of the technique of painting flowers with watercolors.
After you have completed the branches, we outline the main color of the coniferous foliage of the tree. In some places the paint will be a little lighter. Draw the darkest areas in green with the addition of blue - you should get a sea green color.

To add snow to the spruce branches, wait until the paint is completely dry. We paint snow with white paint with the addition of a blue or light blue tint.

How to paint a deciduous tree with paints
Again, we start drawing from the trunk, from which the branches are directed as shown in the image below.

Here we will use a warmer green for the foliage - you can get this color if you add a little yellow to the usual green - this way you can adjust and change the shade. The more shades of green there are in your drawing, the more interesting the final result will look. We paint the shaded areas with dark green and turquoise.

Individual, strongly illuminated petals can be indicated in yellow. Don't forget to paint the trunk with dark and light shades of brown. Also draw the soil, grass and flowers at the base of the tree.

How to paint a tree with paint and sponge
This method is especially popular with children and novice artists. It will require paper, paint and a small piece of sponge or foam rubber.
We start drawing from the trunk. Using light movements using a thin brush, draw the branches.

After this, you need to dip the sponge a little in green paint and carefully leave prints on the paper in the place where the tree crown should be located. You can practice on a rough draft. Adjust the amount of paint and pressure to get the best effect.
Trees are almost always present in children's drawings, the themes of which are related to nature - summer holidays, parents' vacation, a trip to the country, and little artists strive to fill city landscapes with green spaces. It is better to teach a child to draw a tree correctly step by step, starting with pencil sketches and gradually moving on to using watercolors.
How to draw a tree with a pencil step by step
First, explain to your children while walking in a park or forest that a tree consists of a trunk, large and small branches, and a crown. Having seen a tree in real life, it will be easier for a child to draw it.
- Draw two parallel vertical lines on a sheet of paper - you will get a trunk, from which mark the main branches to the right and left.
- Between the thick skeletal branches, bring out thin shoots directed upwards.


- Using colored pencils, make the crown bright green and the trunk and branches dark brown.


How to draw a tree with a pencil - birch
The beautiful birch cannot be confused with other trees because of its white trunk with black stripes. Drawing a birch is not difficult, the main thing is to observe the proportions, thickness, and direction of the branches.
- Draw a thin line on the sheet, draw a second line parallel to it. Make small notches on the trunk and draw out the main branches from them.
- Mark flexible shoots that bend to the ground. Shade the body of the birch tree with black spots and use a horizontal line to mark the place where the trunk meets the ground.
- Outline the entire silhouette of the tree with thick lines. Scatter leaves resembling diamonds with a rounded base on the branches and color them with a green felt-tip pen.

How to draw a tree with a pencil - oak
This version of the deciduous tree image is the easiest.
- Place the wide side of the paper horizontally. Draw a small fluffy cloud in its upper part - a crown.


- From there, draw lines similar to the nose, eyebrows, and mustache of an old wizard from an oriental fairy tale. Outline the foliage with curly curves, reminiscent of a high bouffant hairstyle.

- Add volume to the contours of the trunk by outlining it with a double line. Use winding lines to draw strong branches that support the curly foliage with their strength. Using several rays, lowered down and touching the ends, depict the roots emerging to the surface of the earth.


- Place leaves in the very thick of the crown, forming a living wavy fringe. Erase the unnecessary outline and paint the picture with paints.


How to draw a tree with a pencil - pine
Draw a pine tree according to the diagram - it’s simple and accessible even to a first grader.
- Draw two straight vertical lines on the sheet, tapering at the top. To the right and left of them, according to the number of branches, draw curly clouds - future needles. Connect the clouds with branches extending from the trunk, at the bottom of which make a couple of stumps - the remains of broken off dry twigs.


- Draw the trunk with longitudinal lines, depicting cracked bark. Separate the line of the ground with a wavy line, set up a tent under the tree and color your art with watercolors.

How to draw a tree with a pencil – spruce
Even a child can draw such a tree in a few steps.
- Draw a vertical line, limiting it at both ends with segments. Duplicate it with a second ray and connect both marks at the top point - you get a trunk.
- Draw paw branches going from the trunk to the sides: the first pair - down, the rest - up.
- Draw furry shoots from each large paw. Cover them densely with small needles using a green pencil.
- Use the same principle to decorate the tree trunk. The Christmas tree is ready. Hang multi-colored balls on it, and you have a wonderful applique for a New Year’s card.


Drawing trees is always very interesting and quite simple. The main thing is to use our tips, be observant, and you will come up with a great picture that will decorate a children’s or school corner.