How to remove the connecting rods on a bicycle without a puller. Easy way to remove the connecting rods from the bike. Types of connecting rods and carriage mechanisms
Field repair
As you know, in a bicycle, as in any fairly complex car, a breakdown can occur. This does not mean that it will happen necessarily. But according to Murphy’s law, a breakdown usually occurs at the most inopportune time. That is, the likelihood of a camera puncture increases if you are late for the last train, and the needles burst only when there is no cassette puller. What to do if a breakdown occurred on a trip, on a long hike, away from the workshop, but the necessary spare part or tool was not at hand?
Without top-level rearrangements, you run the risk of causing serious engine damage. One of these problems is piston gripping, which can be disastrous for many other engine parts. In turn, you will be forced to make a complete overhaul or simply break the entire engine if it is bad enough.
When you need to remove the connecting rod
Upper rebuilding may seem like a daunting task for those who haven't done it before. The thought of breaking into the internal operation of the engine may seem intimidating, but in fact it is not so bad. Recovering 2 measures is quite simple, especially with a little guidance along the way. Follow the instructions below as a general guide to complete the restoration, and your dirt bike will last longer at best.
What to do if the camera is pierced
Damage to the camera is a very common bicycle malfunction. Therefore, it is recommended that you always bring along a repair kit for cameras, or a spare camera. If the trouble occurred away from home, and there were no patches or spare cameras at hand, then in this case there is a way out.
It is necessary to remove the damaged chamber from the tire and fill the tire tightly with grass. On such tires, you can slowly, without making sharp maneuvers and braking, get to the place of repair.
When to rebuild your motorcycle bike
There are no hard and fast rules when you need to rebuild the top end of your motorcycle engine. It depends a lot on how the bike rides. If the bike has taken off strongly, it may need to be rebuilt after each racing session, while a lightly-worn bike can travel a year or more without the need for one.
The number of hours at the top end of the engine is the best indicator of when to rebuild. If you continue to maintain maintenance, you can safely cycle your bike from 40 to 60 hours before recovery. Some bikes can go for much longer, while less optimally maintained bikes may not go that far.
What to do if the spoke is broken
Another trouble that often happens with a bicycle is a broken needle. This can happen both as a result of the weakening of the tension of the spokes, and when solid objects get into the wheel. On a long trip, you should grab a few spare knitting needles of suitable length, but it is not always possible to quickly replace a broken knitting needle. Often the spoke breaks on the rear wheel from the side of the cassette, and then to replace it it is necessary to remove the cassette, which requires special tools. If it is not possible to replace the spoke, you can get out of position with a piece of steel wire with a diameter of 1.5-2 mm. The only tool needed for this operation is pliers. A fragment of a spoke on the rim side is crocheted. A wire is inserted into this hook, threaded through a hole in the sleeve flange, and twisted. Naturally, at the first opportunity it is necessary to replace this substitute with a normal spoke.
A compression test can be a very useful indicator if you are not sure about the number of hours at the current upper end. Use a compression tester to ensure that compression is close to the specifications listed in the service manual. If they are too low, you will need to perform a rebuild or at least rewind the piston.
One telltale sign that you have a low compression level is that the bike is very lightweight compared to what it used. Another sign is if the bike has much less energy than before. Continuous contamination of spark plugs is another warning sign. Also look for any coolant leak, as this can lead to serious problems if they are allowed to leak inside. If you are having these problems, it's time to at least run a compression test.
How to remove a cassette without a whip.
Often on a long trip there is a need to remove the cartridge (for example, to replace a spoke), but for this, in addition to the puller, a special whip that holds the cartridge is required. If it was not at hand, then you can use a car puller for oil filters from Lada. (It can be found in any car repair shop.) Another option is to take a stick, wind it with a wire to a chain, and use the chain as a whip.
If you notice debris in the suction when saving the air filter, it may be time to tear down the upper end. This debris can be absorbed into the engine and can cause significant damage, so it is very important to take care of the air filter of your dirt.
Follow these steps as a general guide to disassemble the top end of your motorcycle engine. Some engines may be slightly different, and some steps may not be appropriate for your particular bike model. Rinse thoroughly. Before you begin the process of tearing off your motorcycle, you should take the time to completely wash the bike. An inconspicuous piece of crispy dirt can fall into the cylinder or into the body, which will further damage the engine you are trying to fix.
How to remove the connecting rod without a puller.
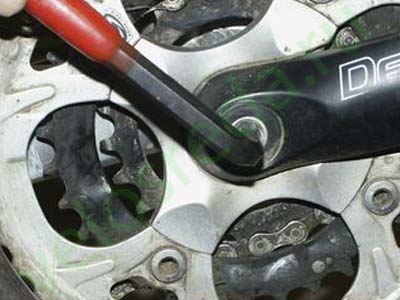
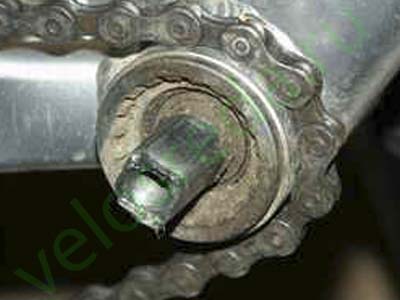
It is necessary to remove the connecting rods when repairing the carriage. To remove the connecting rod, a special puller is required, which is screwed into the connecting rod. If it wasn’t at hand, you can unscrew the screw or nut with which the connecting rod is drawn to the axis of the carriage and ride a few hundred meters. After this, the connecting rod is quite easily removed if it is gently tapped with a hammer (through a wooden block). It is necessary to act carefully, a strong blow can damage the carriage.
Any abrasive debris inside your engine can end up causing serious damage. When you wash your dirt bike, be sure to plug the exhaust and close the air purifier along with any overflow hoses. Draining coolant - Before draining the coolant, make sure that the engine is cold. To get started, place a pan under the water pump and remove the drain bolt. Slowly open the radiator cap to speed up the drain process. You must be prepared to move the pan to catch all the coolant.
How to unscrew stuck pedals.
Often the pedals are wrapped in connecting rods with such force that it is almost impossible to unscrew them. If it is necessary to remove the pedals, (for example, before loading the train), then you can try to heat the connecting rod by pouring boiling water at the place of its connection with the pedal. Since the connecting rod materials and pedal axes have different temperature expansion coefficients, they expand differently when heated, and after heating the stubborn pedal usually still turns away. Just don’t mix up which way to pedal - the left-hand thread is used on the left pedal.
Remember to reinstall the drain plug when all refrigerant has gone out. Move or remove the carburetor. At least the carburetor will need to be removed from the road for all dirt bikes. To do this, you will have to disconnect it from the engine if the fuel line is still connected. Then it can be removed from the path. For some bikes, it must be completely removed. You can also remove the carburetor in any case so that it does not completely match your path. If you remove the carburetor, be sure to close the fuel line and the fuel inlet on the carburetor to prevent debris from entering.
By heating, it is possible to facilitate the loosening of many other threaded joints, in particular a screwed ratchet.
So that later you do not have to do physical exercises when turning the pedals or ratchets, do not forget to put a little grease on the thread before assembly (for example, Litol-24)
What to do if the brake disc is dirty.
Disc brakes sometimes stop working properly due to dirt, oil getting on the pads or disc. In order to restore their performance, the pads with the disk must be warmed up. Usually for this it is enough to brake a few times lightly, without stopping the rotation of the pedals. In case of severe pollution, it is necessary to slowly pull the brakes along a rather steep descent. The brake discs become very hot (do not check their temperature with your finger - you can get a burn!) And all the oily dirt will burn out.
Step-by-step instructions on how to remove the pedal from the bike without a puller
Remove the top engine mount. Then you need to remove the upper engine mount on the engine using a socket or a wrench. After you remove the hose, you can detach the spark plug cover and slide the plug to the side. Then remove the spark plug and set it aside.
If this is a gasket, try removing as much as possible. For these engines, the connection must be disconnected before the cylinder jug \u200b\u200bcan be removed. To access the connection, you must first remove the cover of the power valve. To disconnect the connection, you need to remove the mounting bolt. Some models have a groove for a holding tool under the bolt. This will keep in touch when you remove the bolt, protecting it from damage. After removing the clutch, make sure that you also remove the spacer.
What to do if a chain breaks on the road.
Usually, in this case, a pair of links in the gap are bent and fail. It is best to replace them with new links from a chain of the same type. (Therefore, on a long trip, you should grab a piece of chain of 8 - 10 links). If there are no spare links, you can shorten the chain by removing a couple of damaged links. However, some combinations of stars may stop working.
To get started, loosen the cylinder nuts with a socket wrench or socket and remove them. With the nuts removed, you can pull the cylinder out of the studs and position the dowels. You may need to break the cylinder by tapping it with a hammer. If necessary, be careful not to hit the cylinder too hard and damage it. When pulling the cylinder, it is important to maintain the connecting rod and piston when it is released. When the cylinder is turned off, you can place a clean microfiber cloth or plastic bag over the opening of the housing to prevent debris from entering.
What to do if the brake or gear shift cable breaks.
It is best to replace a damaged cable with a new one. (Therefore, on a long trip, you should grab the spare cables for the brake and the switch). If there are no spare cables, you can try using a pair of pliers to tie a knot in the place where the cable breaks (and the cable usually breaks in the place where the boss is attached to it) and put this knot into the brake or brake lever. Sudden braking, of course, will have to be avoided, but you can get to the place of repair.
Then remove the base pad, trying to clean as many hands as possible. Remove the snap rings and wrist. Now you can remove the retaining rings holding the wrist in the piston. To do this, use a small clamp or needle-nose pliers. You can then use a socket of a similar size to press on your wrist through the piston. If the bracelet does not move freely, you may need to use a piston pin puller that is specifically designed for this task.
The needle holder should slip out of the connecting rod after removing the piston. Clean the gasket surfaces. Now that you have taken apart the top end of your motorcycle, you can completely clean all surfaces of the gasket. It is very important that you remove all residual old gaskets so that you can create a tight seal with new ones. Use a gasket scraper to remove jammed gasket. A razor blade can also be used in a pinch. Be very careful not to wipe or damage these surfaces, while scraping out the old gaskets.
What to do if the rear derailleur gets into the wheel and breaks down.
It is necessary to remove the remnants (or remains) of the switch from the spokes, put the chain on the middle sprocket of the cassette, and shorten the chain by removing the extra links. The bike becomes single-speed, but it allows you to get to the repair site. Do not forget to check the condition of the spokes.
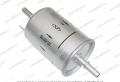
To remove the connecting rods you will need a special key - the connecting rod puller. It is a screw with a two-section head (socket wrench and face spanners), on which a specially shaped nut is screwed with internal and external threads. Often an adapter is attached to the puller for use with splined joint carriages.
It is important that you inspect all parts of the engine that you now see to check for excessive wear. If you see some problems inside the case, you may need to completely stall the engine to fix the problem. If you allow problems to be left uncommitted, you run the risk of completely destroying the engine, requiring you to do a complete rebuild anyway. Below are the things you can check when the top end is removed.
Inspect the needle bearing. A new needle bearing may come with a conversion kit for the upper end, but it’s still good to check the old one before you discard it. If the bearing is missing needles or is excessively damaged, you can expect that there may be damage to the cylinder and head. If a new needle bearing is not included, make sure that the old one is not completely damaged.
When buying new connecting rods, you need to consider their method of attachment to the carriage. It can be square or slotted (slotted joints of several standards). It is also important to consider the length of the connecting rod when choosing a new one, if you buy too long connecting rods, they will touch the obstacles when driving over rough terrain, and if you need to short, additional efforts will be required when pedaling.
If this exists, the connecting rod must be replaced. Now take the connecting rod and try to move it up and down without turning the crankshaft. If there is any game, the bearings will need to be replaced. You can also check the lateral play of the shaft by inserting a flat probe between the shaft and the thrust washer.
Remove the connecting rods from the bike without a puller
You can then list this measurement according to the specifications given in your service manual. Check cylinder. You will need to inspect the cylinder for uneven wear, scratches and protrusions. First, make sure the cylinder is completely clean. If you have a brush, you can use it to remove all debris and debris that may be filled with cross-strokes or scratches. If the cylinder is gold plated, find any nicknames. If there is, you will need to refill the cylinder.
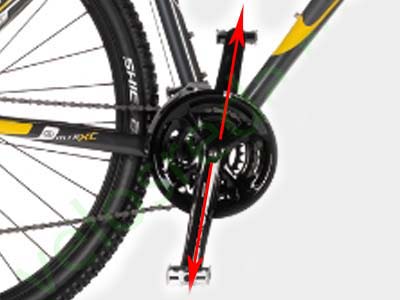
Removing Bicycle Cranks
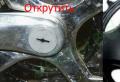
1. Remove or unscrew the boot cap.. Some plugs are enough to pry off with a screwdriver, and some will have to be twisted.
![]()
2. Remove the bolt (or nut) which pulls the connecting rod to the carriage and remove the washer (if any). To do this, you need a ring wrench (usually at 14), or an 8 hexagon for a square connection or a 10 hexagon for a spline connection.
If it is a cylinder with sleeves and scratches or grooves, the cylinder can be honed or cut more. If the cylinder perfectly checks nicknames, scratches and grooves, you can now measure the hole. Calipers can be used if they have everything that you have, but they will not give you the most accurate measurements. First measure the top of the cylinder in all directions, then in the middle, and then at the bottom of the cylinder. Make sure the cylinder is not out of the circle or wider below than the top or vice versa.
If so, the cylinder will need to run out of gas so that it can be locked. If the hole is even for the entire cylinder, you can now check your measurements to make sure they meet the tolerances in your motorcycle's instruction manual.
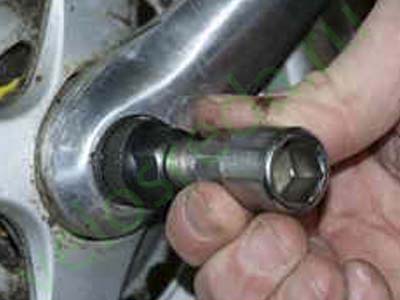
3. Take the connecting rod puller and unscrew the inner screw completely.
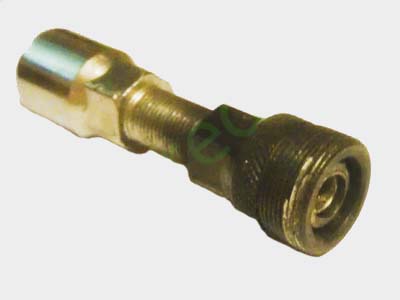
Please note that with a square connection, the inner screw should be narrower and the adapter pad must be removed (if it is worn), and with a spline wider, the adapter pad must be put on accordingly. Be careful, there have been times when people did not remove the pad, as a result, it rested on the connecting rod itself, and not on the carriage axis. As a result, they tore the thread on the connecting rod.
If the hole is too large, you may need to use a piston with a large piston. Inspect the cylinder head. Use a parts washer or wire brush to clean the carbon and other lumps from the cylinder head. After cleaning, make sure that there are no scratches, protrusions or indentations in the head.
Replace any compromised ones to make sure that your cylinder stays flush and securely locked after reinstallation. Now that you have all of your top-level components cleaned, ready, and up to the specification, you can begin the reassembly process. Pay particular attention to ensure that you do not forget any components while returning the top end.
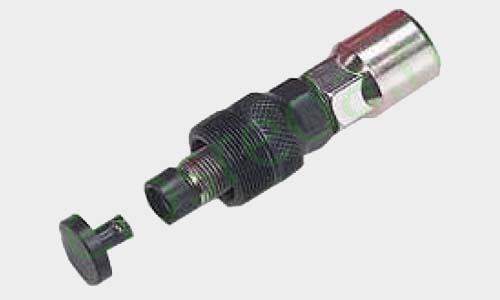
4. Screw the puller into the connecting rod. Screw the puller all the way, otherwise it may break and damage the thread.
5. Tighten the internal screw of the puller with a wrench. Twist it clockwise and you will see how the connecting rod comes off.
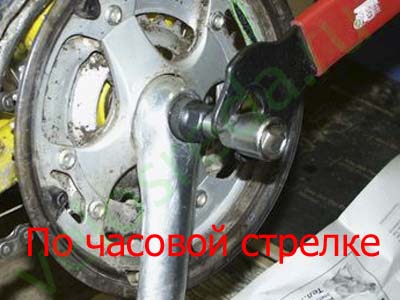
6. After removal of a rod unscrew the puller.
If the connecting rod does not lend itself in any way, do not exert too much force, otherwise you can break the thread and then it will be even more difficult to remove it. Fill the connection with oil or WD-40 and try again. When the connecting rod puller is not at hand, you can unscrew the bolts tightening the connecting rod and the carriage and drive a few hundred meters without them. After the connecting rod should be easily removed, if lightly tapped on it with something weighty (through a wooden block or stick). You can also heat the junction of the connecting rod and the carriage, but do not use any burners for heating, they will harm the connecting rod, heat it with boiling water.
And one more thing, if you need to, then it is better to unscrew them before removing the connecting rods, it will be easier.
Before installing the connecting rods, clean the joints on it and the carriage from dirt. Then lubricate the inside of the connecting rod with grease.
Put the chain on the carriage assembly (when installing the right connecting rod), put the connecting rod on the axle and tighten the tightening screw.
Putting on an opposite rod do not mix up its position.
Tighten the bolts very tightly. If it is not enough to tighten them, then backlash can form during riding.
Put anther caps and a chain on an asterisk.
Cranks installed.