The electrical circuit for connecting the downhole pump. How to connect a downhole pump - schemes, procedure and recommendations
Submersible pump is one of the main devices for supplying water to the house. The equipment is selected based on the needs of the user and the parameters of the water supply source. Installation submersible pump can be produced by professionals and independently. How to mount the equipment on your own, this article will tell.
Types of Submersible Pumps
By designation, all submersible pumps can be divided into three large types:
- . The equipment is capable of lifting water from great depths and transmitting it over long distances;
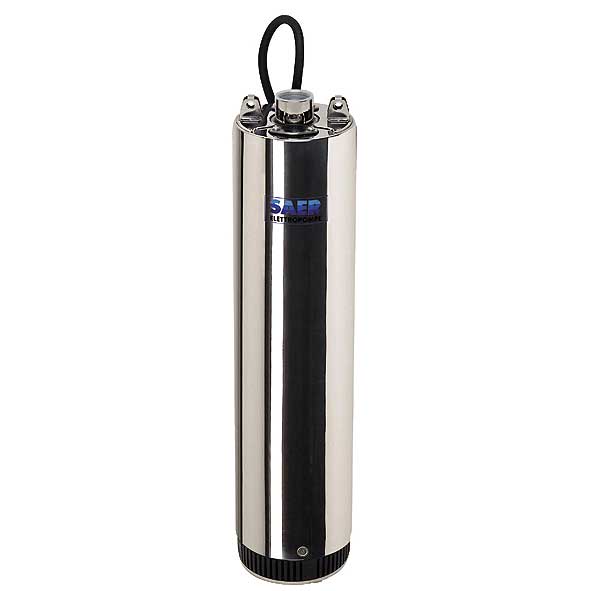
- well. Submersible pumps designed for installation in a well are characterized by lower power, which affects the head output and productivity. Bright representatives of well pumps are devices such as Kid and Trickle;
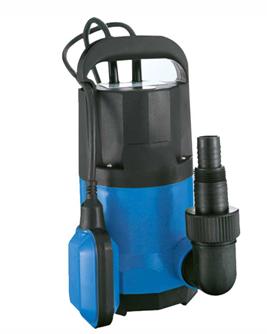
- . Used for pumping contaminated water from pools, basements, drainage wells.
Installing the submersible pump yourself
The installation of a submersible pump depends on the type of equipment depending on the location of its future location.
Installation of a pump in a well
To install a submersible pump in a well to provide a country house with drinking water, you must:
- to lay a water supply system that will connect the equipment in the well with plumbing products located inside the building;
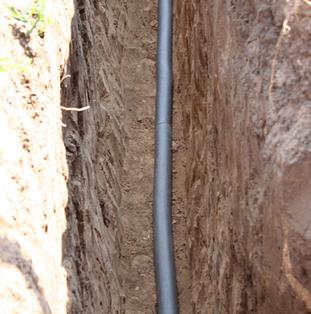
The depth of the water pipes should be greater than the depth of freezing of the soil in the region.
- bring a power cable to the well with which a submersible pump will be connected. The wire can be laid on the surface of the earth in a specialized protective sleeve or together with water pipes. In the latter case, the cable will be less susceptible to technical damage;
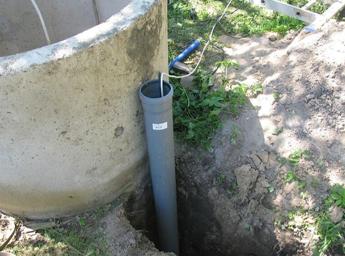
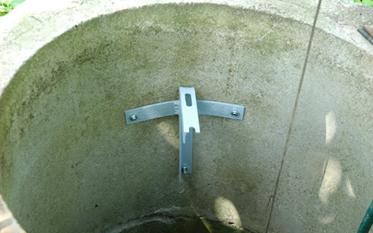
- on the upper ring of the well attach the bracket to hold the pump. If the depth of the water supply is more than 20 - 30 m, then for the convenience of removing the pump, you can make a special metal formwork. For smaller depths, the simplest bracket is suitable, to which the pump will be fixed with a metal cable;
- the pump is connected to the plumbing system;
If the equipment is not equipped with a non-return valve to prevent the passage of fluid in the opposite direction, it is recommended to mount the device additionally.
- power supply is connected. It is advisable to attach the cable to the pipes located inside the well with insulating tape. This will avoid any damage that could damage the pump;
- the prepared system is lowered into the well to the required level and fixed on the holding device;
The first start-up of the pump should be monitored. At the same time, the correct operation of the device and the tightness of all are checked.
Installation of the pump in the well
The pump in the well is installed according to the principle similar to the installation of the pump for the well:
- at the first stage, water pipes are routed to the well and consumption taps;
- the pump is strapping. A drainage pipe and power cable are attached to the equipment. The connection diagram of the submersible pump must be complete with the device;
- all wires and pipes are fixed with insulating tape to prevent damage and tangling;
- the prepared structure is lowered into the well to a certain level;
- the pump is fixed on the head.
The head of the well is not only a holding device for the pump, but also protects the water supply from various objects, leaves, and other debris. The cap is also the link between the pump and the water system of the house.
- the drainage system is connected to the head.
Checks the correctness of the work and the commissioning of the device. If you have problems installing or connecting the equipment, you can get professional advice on how to connect the submersible pump correctly. To do this, it is recommended to contact the manufacturer of the equipment.
You can learn more about the process of installing a pump in a well by watching a video.
Accumulator connection
If desired, a hydraulic accumulator can be connected to the pump. Connecting the submersible pump to the accumulator will allow:
- extend pump life. The accumulator creates a supply of water. When you turn on the plumbing product, water is primarily consumed from the tank and only when the critical level of the liquid is reached does the pump turn on. A single start-up of the pump satisfies the needs of users and refills the tank. Thus, when using a hydraulic accumulator, the frequency of switching on of pumping equipment is reduced, which leads to an increase in the period of operation;
- reduce the number of pressure drops due to the use of several taps at the same time;
- protect the water supply system from water hammer that may occur when the pump is turned on.
The connection diagram of the accumulator to the submersible pump is shown in the figure:
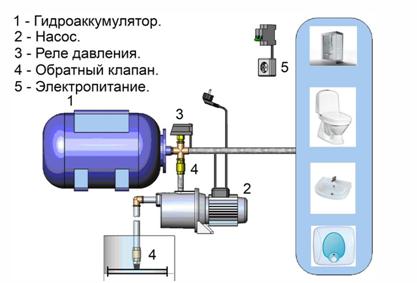
The accumulator cannot be installed without a pressure switch, which trips when a small liquid level is reached in the tank.
Installing the pump in a well or well is quite simple. The main thing is to choose the right equipment and prepare in advance all the additional materials in the form of connecting fittings, a check valve, additional electrical wires and so on.
Water supply of a country house is a considerable problem. They solve it in different ways: someone digs wells, but most often the inhabitants of the rural strip turn to drilling water wells.
By itself, this task also causes certain troubles. But the crucial process does not end there. Having drilled a well, the owner is faced with such a task as installing and connecting a well pump. As experience shows, this problem is completely solvable, you only need to know the features and sequence of the solution.
Well pump: purpose and types
This unit is designed to quickly raise sufficient volumes of water from the ground. The power of modern pumps allows us to provide not only drinking and domestic water consumption, but also to pump the required amount groundwater for agricultural irrigation.
At the location of the downhole pump in the workings and the principle of their operation, all pumps are divided into surface and submersible.
Finding out the differences between these types is important for understanding the installation and connection of the pump.
Surface devices are less and less used in the water supply of private homes and household plots. This is due to a certain functional limitation of surface equipment. Since its installation is not carried out in the well itself, but on the surface of the earth, the liquid is taken from the production by the suction method.

This method is applicable only when the aquifer lies at depths of up to 8 m. Since in many cases the consumer is forced to pump water from great depths, he has to pay attention to submersible models.
This type of well pump is characterized by ease of installation and dismantling. However, its main feature is that the unit for supplying water to the surface is lowered into the well itself. Since such a pump works on the principle of expelling fluid from a mine, it is immersed in the water column at least 2 m below the upper groundwater level.
The effectiveness of such a unit depends on the height to which it is able to lift the required volumes of water. This ability determines the power of the pump motor. Currently, devices are available that provide water rise to heights of 40-80 m.
It is worth noting that today all well pumps are equipped with smooth descent devices, protective systems against sudden voltage fluctuations, from impeller displacement along the axis, and automatic restart.
Factors important when connecting and installing the pump
To determine the main technical parameters of the selected pumping equipment, as well as to design the circuit of its connection, you should pay attention to the following characteristics of the water output:
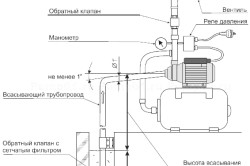
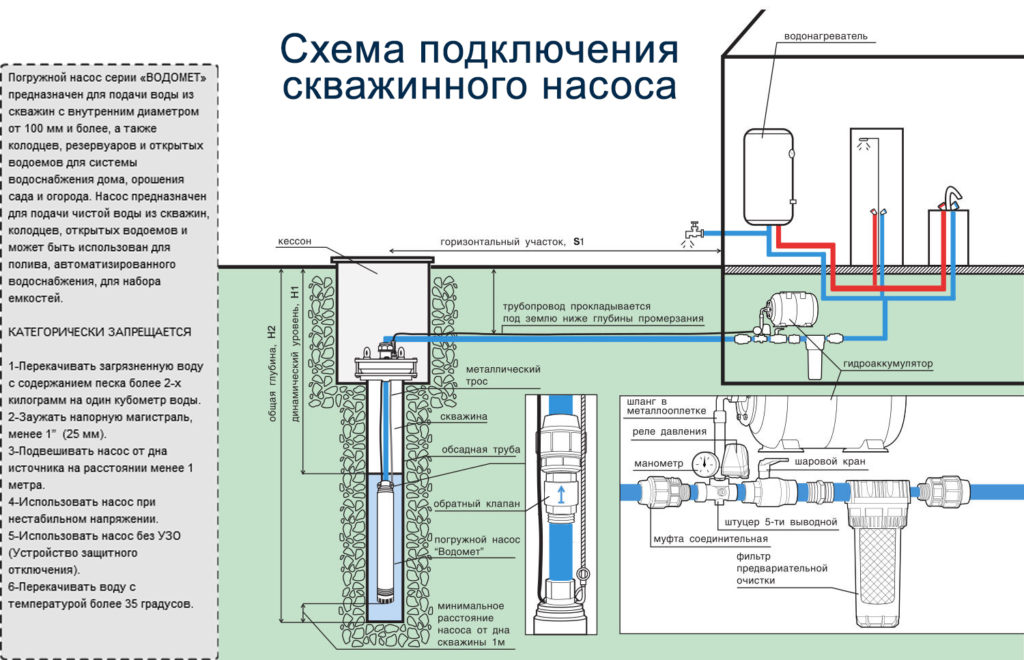
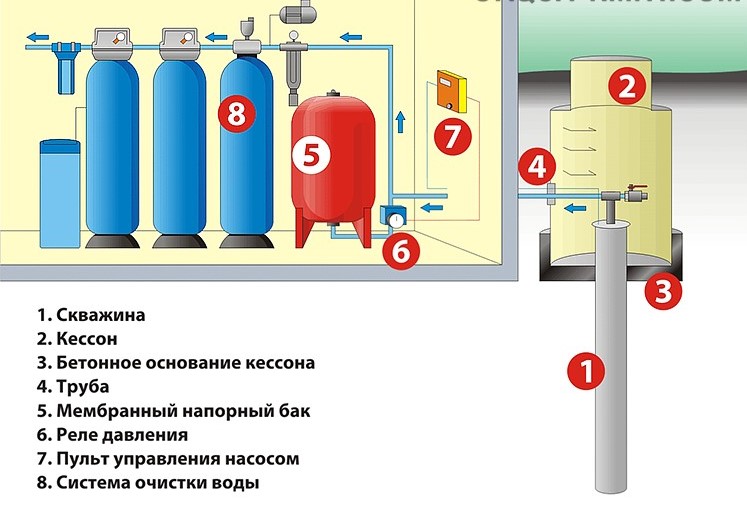
Figure 1. Installation diagram of a downhole pump.
- Well depth. Measured using a rope with a load at the end lowered into the trunk. The upper water level is set along the boundary between the dry and wet parts of the rope. The depth set in this way must correspond to the pump data sheet.
- Debit wells. Shows the volume of water that the production is capable of delivering to the surface in a unit of time. To determine this parameter, it is necessary to pump out all the water from the well with a temporary pump, and then wait for the moment when the barrel is again filled with liquid. The debit is determined by dividing the time taken to refill by the time spent on the full pumping of water.
- Borehole diameter. It can be measured independently. The most practical is considered a diameter of 4 inches. Under it, you can choose the maximum number of pump options.
- The amount of water consumed. For a standard family of 3-4 people, a productivity of 60 l / min will be sufficient. The irrigation pump should be more powerful.
- Ability to clog up production. Old or poorly drilled trunks can often be washed out with sand and other impurities. In this case, it is recommended to purchase not universal, but special pumps.
How to connect a well pump?
When connecting surface-mounted pumps, ensure that the automation operates normally. For this, sensors for determining the minimum and maximum water levels are placed in the storage tank.
As a rule, a float version of the sensors is purchased for this purpose. They are connected to the starter coil, which controls the start-up process of the entire system. All components are selected depending on engine power and the number of working phases.
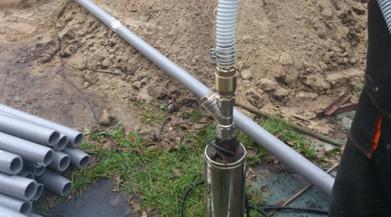
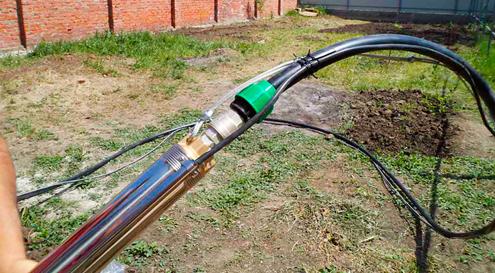
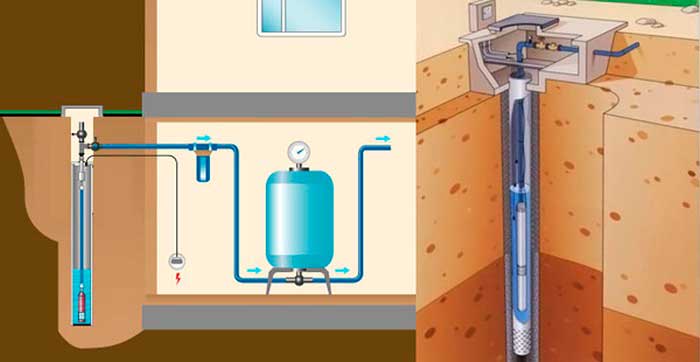
The connection of the submersible pump to the water supply system (Fig. 1) begins with the connection of the valve and nipple to it, for which the supplied hose is used. All connection points are sealed with adhesive tape.

Using a hose, the nipple is connected to a check valve that protects the system from water hammer. The valve itself up to this point should already be checked for the correctness of its installation in the system.
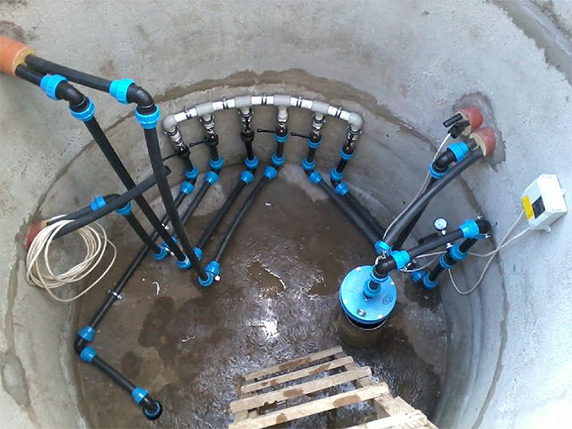
Next, a water supply hose is connected to the pump. At the site of the overlap of the well, it connects to another hose connected to the membrane tank to maintain pressure. The indicated capacity is installed in the house into which water is supplied from the well. All manufactured compounds are also carefully sealed to prevent leaks.
Then the pump cable is pulled through the tip hole, which will subsequently close the well so that no debris gets into it. The electric cable itself will be connected to the electronic water supply system.
Some features of a well pump installation
Bringing the pump into working condition, along with connecting it to the fluid supply system, also includes the installation process in the well.
Before this, the well itself must be well cleaned. To do this, using a temporary pump, water is pumped out of the production until it is poured out of the hose without sand and impurities.
After completion of the preparatory phase, the pump is lowered into the well. At the same time, they make sure that the descent runs uniformly, freely, without interference, hooks and pushing. If the well is too narrow, it is recommended that a rubber ring be put on its body to protect the pump.
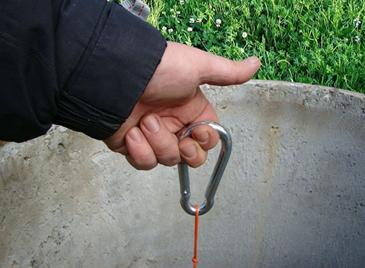
The device is lowered into the barrel with a wire, metal or nylon cable. The latter option looks preferable, since the nylon is very durable and not afraid of water. After the unit reaches a predetermined depth (it cannot be lower than 1 m to the bottom of the well), a safety cable is attached to the upper tip of the well. An electric cable and a pipe through which water will be pumped are brought directly into the house.
Since the pump produces a fairly strong vibration during operation, a spring suspension must be made in the place where the cable is attached to the housing. This element, which is made from a piece of rubber tape, is attached to the pump at one end and to the crossbar at the other.
If in the future the homeowner does not intend to limit himself to supplying water only to the apartment building, one or more additional outlet pipes can be provided in the water supply system. Such a branching of the outputs makes it possible to use the power of the pump for simultaneous and independent water supply of several objects at once, for example, housing, a garage, a personal plot.
Thus, in order to properly mount and connect the pump, you must use the advice of experienced professionals and the instructions that the buyer receives complete with the device itself. In this case, it will serve for a long time and reliably.
The use of borehole pumps for domestic and small business needs is quite widespread. The first and most difficult thing is to have the well itself, in which there is water. If there is such a source, then the next, no less important task, will be raising water from it to the surface. For this purpose, borehole pumps are used.
The vast majority of their potential owners do not always know how to correctly approach the selection of the right unit. It is also important to know the order and rules of pumping equipment. This will help some basic knowledge, which will be discussed below.
Well pump selection criteria
When choosing this device, consider the following:
- Unit operating point
This indicator determines the intersection of the parameters of the device properties of the well. It is known that water in wells does not have a constant level. These indicators are indicated in the passport of the water source. If there is no such document, measurements can be performed independently. It is recommended to perform several measurements to get the average water level.
It is important that their average indicator coincides with the passport characteristics of the purchased equipment, which operates in the range from 70 to 120% of its nominal parameters. - Types of Well Pumps
Knowing the depth of the water source, you can determine which type of unit is needed - surface or submersible.
Fundamental differences in pump types:
- Self-priming surface the device will allow you to raise water from a depth of up to 9 m. This option is suitable for small wells.
Its advantage is the possibility of external mounting and easy accessibility in case of need for repair or dismantling.
It is negative that this unit freezes in the cold and requires filling the suction channel with water before starting work.
The device data is divided into:
- centrifugal without ejector,
- self-priming with ejector. - Submersible unit will work at any depths. This type is the most suitable in any situation. It is more difficult to install, but such a pump works all year round.
More on key technical specifications and installation conditions.
The length of the water supply system and the number of nodes
Although water will move horizontally through the system, losses in nodes and pipes cannot be avoided. It is recommended to buy purchased equipment with a power reserve of up to 20%.
These devices are also divided into two categories:
- centrifugalhaving a higher price and better performance;
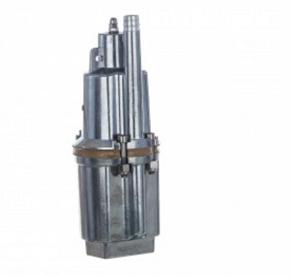
- vibratingthat cost less and work worse.
Vibration pumps have a suction valve, which can be located:
- at the top of the appliance;
- at the bottom of the device.
The ability to avoid the ingress of bottom mud, in the first embodiment, can be offset by a problem in operation at a low water level in the well.
The second option has opposite sides - near the bottom such a pump sucks in clay, and at the same time, a low water level will become an obstacle several times less.
Installation of vibrating devices is not recommended in sand wells, which are considered to be all channels made to the depth of interstratal or groundwater.
Features of installation of equipment
There are two mounting options for the pump.:
- The self-priming device is mounted next to the water source. A special immersion hose is lowered into the water at one end and attached to the pump with the other.
- The immersion device is attached to the pipe. If this is a flexible hose, then the addition to the fasteners can be a cable, which is attached at one end to the pump, the second to any stable element with a well. A flexible mounting option is preferable, as it allows you to adjust the immersion depth of the unit. The pump is completely immersed in water. Most of these devices do not tolerate work "dry." Therefore, you should always monitor the level in the well or purchase a pump with float switch, which will protect the device in case of absence or critically low water level.
Installation algorithm submersible equipment includes how many points:
- All pipes are mounted. If the pump will be installed on a rigid pipe, it is recommended to put a small piece of a flexible hose between it and the main channel for moving water into the house, which will dampen the vibration of the engine.
- Connect to the device:
- cable
- electric wire
- a hose. - The pump gently lowers to the bottom of the well.
- When the unit touches the bottom, the entire structure should be raised to a height of half a meter to a meter from the point of contact.
- The cable must be tightly fixed, the wire should be connected to the network, the hose should be connected to the rest of the system and laid in the fastening channels.
- It is recommended that the top hole of the well be provided with a cover to prevent foreign objects and dirt from entering the system.
Electrical connection should be made only to a grounded source by means of a circuit breaker according to the following scheme:
Well Features
When the well is completely ready for work, you can turn on the pump and start pumping water out of it, the quality and quantity of which can vary greatly. The main influence on this is exerted by several indicators, namely:
1. Depth
Water of different properties is extracted from different depths. These mineral depths are commonly called horizons. In cases with water wells, there are four such horizons:
- Simple well with a depth of up to 20 meters.
- Well-wellhaving a parameter of up to 30 m.
- Sandy horizon, which is located at a distance of 50 - 70 m. below the level of the soil surface.
- Artesian skyline. Its depth can be 100 meters or less.
The choice of the depth of the future water source will depend on many factors, one of which:
- intended purpose of the source,
- the required amount of water
- the presence or absence of permits,
- price,
- geodetic conditions of the area,
- depth of the aquifer.
2. Diameter
This indicator directly depends on:
- drilling equipment parameters,
- characteristics of the future pump,
- affordability of the process,
- target destination.
The larger the diameter, the more expensive the well will cost, the larger the diameter of the pipes will be required to equip it.
The positive side is high performance. When choosing a drilling diameter, you should always be guided by the principle of sufficient necessity. At the same time, it is recommended to make a small margin in the parameters, since it is not always known for certain:
- how much water will the future source give;
- how quickly he will recover;
- how the well will behave after a long time.
3. Well production
This definition refers to the maximum amount of water that can be pumped out of the well in one hour.
This parameter not only depends on the power of the installed equipment, but also on the ability to restore the source itself. It is rare that a well or a drilled artesian canal can infinitely pump water in large volumes. The more powerful the equipment, the sooner water will be pumped out. The more often pumping will be carried out, the smaller the volumes will be.
Weak equipment can work for a long time, pumping to the top of the water as much as being restored in the well.
Determining the exact flow rate is a complex process and unnecessary for individual use sources.
4. Volume of water consumed
This indicator depends on the flow rate of the source and the needs of its user. If water consumption is less than the well can provide, then problems with its shortage can be avoided.
The amount of water in the well, in addition to its depth and width, may depend on:
- time of year
- pumping rates,
- parameters of the equipment used.
The correct calculation of consumption will allow you to rationally spend valuable natural resources. This will allow additionally:
- save energy
- extend pump life
- provide better and cleaner extracted water.
A competent and thorough approach to the development of an autonomous source of water supply for the site will give its owner the opportunity to access the most valuable natural resource, which you need to respect and love. This will certainly have its positive consequences in the near and distant future.
To organize individual water supply of a country house, you will need a well or drilling a well with the installation of a submersible pump. In the second case, it is quite difficult to dig a well with your own hands - you will have to attract specialists and bear financial expenses. Significant funds can be saved in the subsequent stages of work by connecting the pumping equipment to the source of water intake independently.
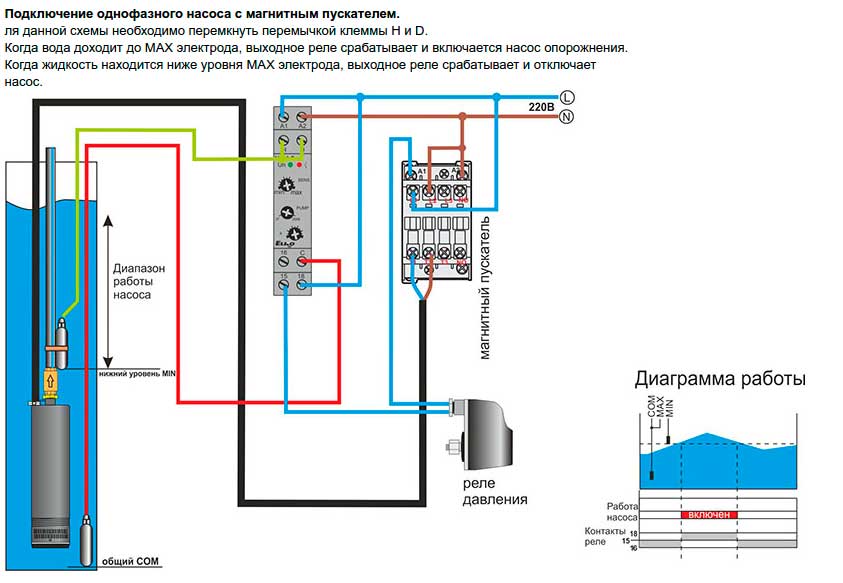
Automation for connecting a borehole pump
For automatic continuous operation of the water intake system, it is necessary to have devices that monitor the order of water supply. The industry produces a wide range of instruments for performing these functions, from the simplest mechanical sensors to complex electronic units with indicator control panels. Conventionally, all these devices can be divided into several categories.
First generation automation
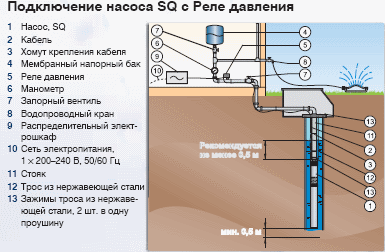
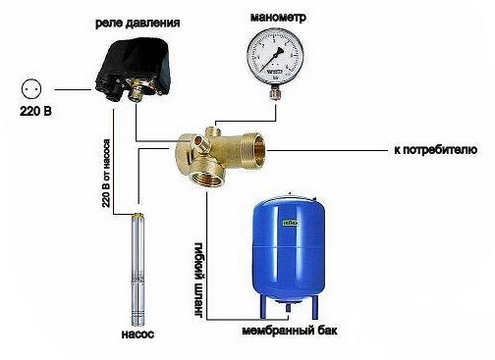
Simple control devices for pumping equipment include a pressure switch and a hydraulic accumulator. Installation and connection of the pump in the well requires the additional use of a dry-running sensor, a pressure gauge is required to monitor operation and adjustment.
Fig. 1 Basic equipment for the automation of water supply
2nd generation automatic devices
These devices are sensors and electronic circuits assembled in one box. The device is installed anywhere in the water main, can operate independently or with a hydraulic accumulator.
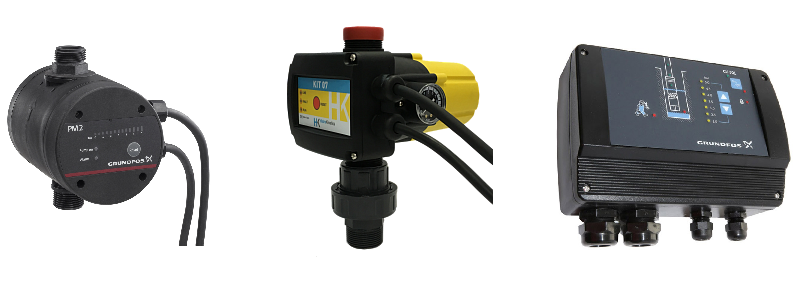
Fig. 2 2nd generation control units
2nd generation control units can have built-in sensors and perform the following functions:
- pressure switch;
- device for protection against dry running dry running;
- duct tracking device;
- integrated check valve;
- status indicators;
- shock absorber;
- pressure gauge;
- automatic restart;
- anticyclicity;
- smooth start.
In such devices there is no way to regulate the pressure, so their purchase for the replacement of devices of the 1st generation has limitations.
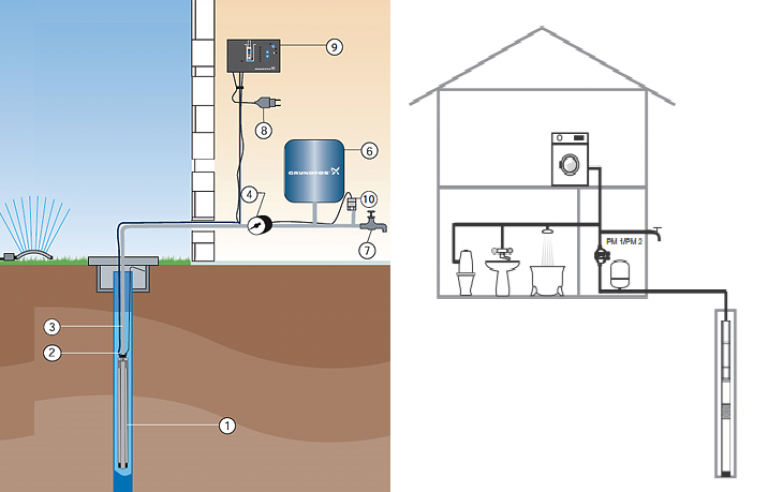
Fig. 3 Connection diagram of the Grundfos PM1 - PM2 to the well pump
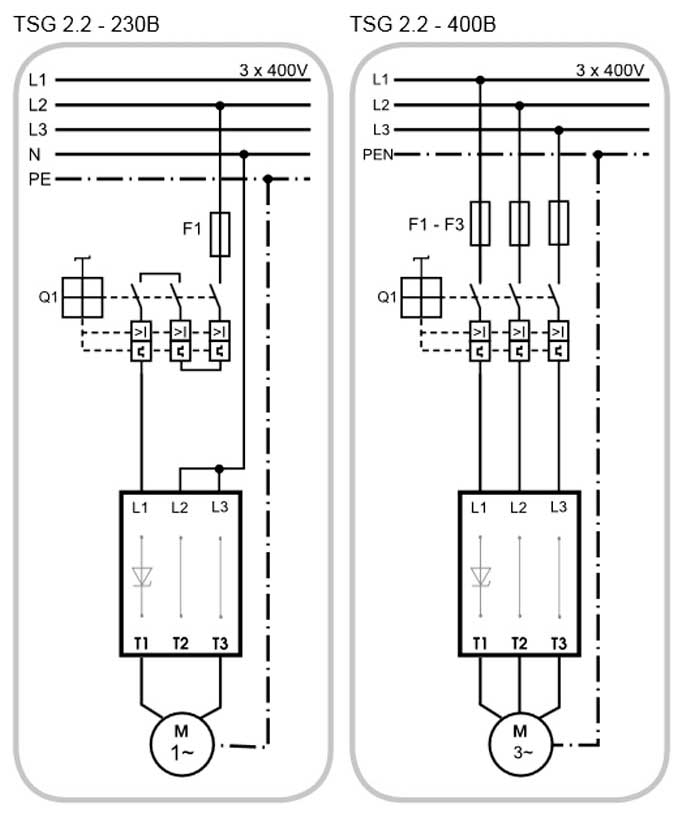
3rd generation automation
High-tech control system for the operation of pumping equipment, at a cost higher than 2nd generation automation.
The control units of electronic devices of the 3rd generation have the function of frequency conversion of the pump supply voltage - this allows you to adjust the rotation speed of the shaft of its electric motor. The system works with reference to water consumption: the higher the flow rate, the faster the motor shaft rotates and, accordingly, the pressure and water supply to the consumer increase, and vice versa. This allows you to always maintain constant pressure and pressure in the system (the main advantage of automation of the 3rd generation) and to avoid sharp cycles of switching on and off of the electric pump.
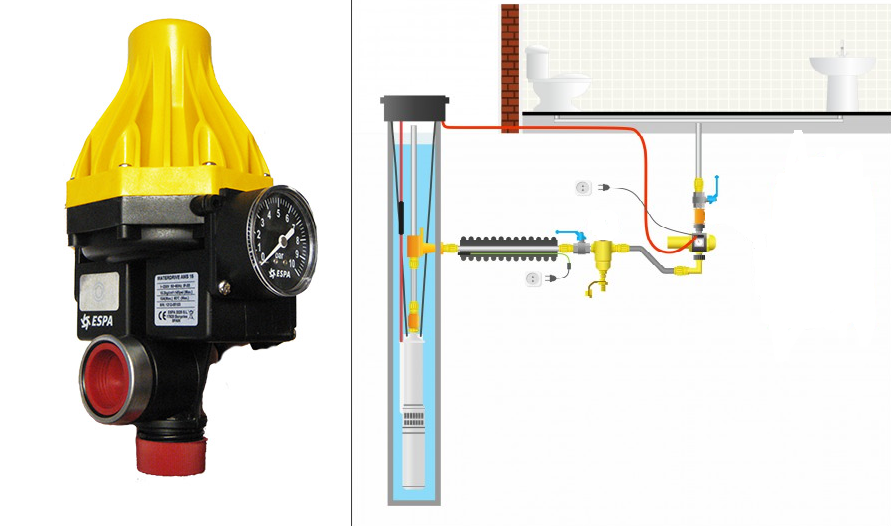
Fig. 4 ESPA unit with frequency converter and its wiring diagram
The control units can be mounted anywhere in the main water supply system; a hydraulic accumulator is not required for their installation. They are indispensable devices in irrigation systems and others where it is required to maintain a constant pressure for a long time.
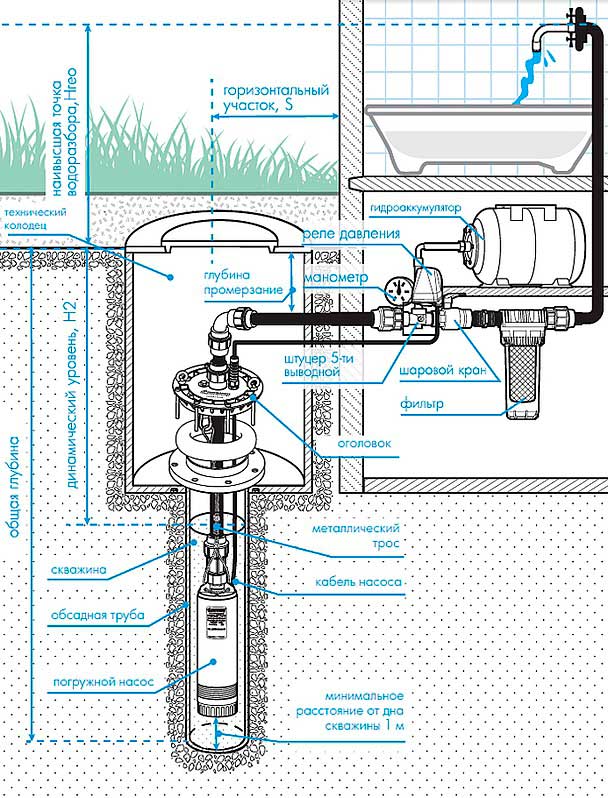
Well pump connection diagram
OUR READERS ADVICE:
A detailed connection diagram is as follows.
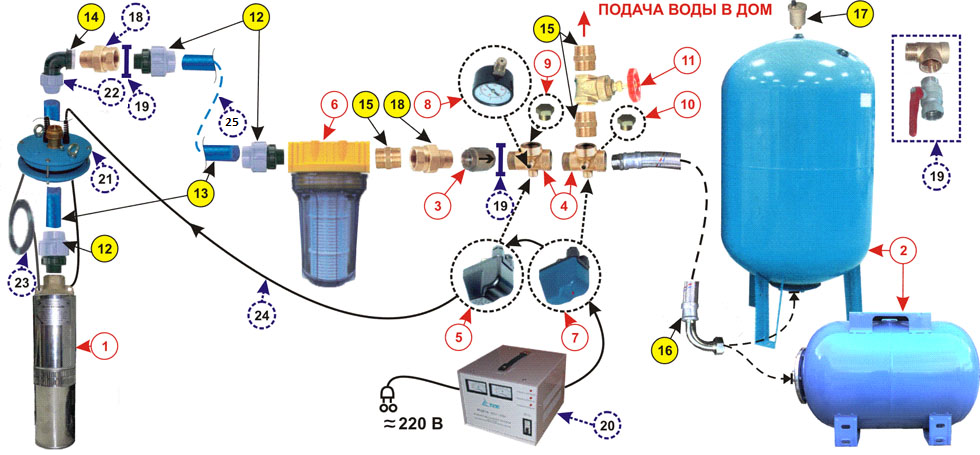
Fig. 5 Connection diagram for the organization of a water supply system with a submersible borehole pump
- Downhole well pump. Commonly used models are centrifugal. Such devices have high efficiency and allow you to raise water from considerable depths, depending on the number of impellers forcing pressure.
- Hydraulic accumulator with a capacity of at least 50 liters. Maintains constant pressure in the water system and protects it from water hammer.
- 1 ″ check valve (optional with strainer) holds water in the system, making it easy to start the electric pump.
- Two 5-way fittings connected in series. The main element of plumbing fixtures designed to connect several devices with different diameters and types of threaded connections.
- Pressure switch with internal or external thread. The main element for ensuring the automatic operation of the water supply system. Carries out connection of the borehole pump and its shutdown.
- The filter of thin water purification 5SL or 10SL with replaceable cartridges.
- Dry running sensor. The connection of a borehole pump to automation, unlike other types (well, drainage with a float switch), requires protection from working in space without water cooling their engine.
- Axial pressure gauge.
- Plugs on the free outlet holes in 5-way fittings for 1 ″ and 1/4 ″
- 1 ″ shut-off ball valve that shuts off the water supply to the house
- Metal-plastic coupling 32х1 ″ Ш and metal-plastic coupling 32х1 ″ ЦШ.
- Reinforced metal-plastic pipe 32x1 ″.
- Corner pipe size 32x1 ″ G.
- Coupling with a diameter of 1 ″ ShSh.
- Armored connecting hose angular 1 ″ x800 high pressure.
- Air vent with Majewski tap or 1 ″ plug. It is used to adjust the pressure in the accumulator.
- Connection quick disconnect 1 ″ (American).
- Water drainage system: consists of a 3-outlet fitting and a 1 ”ball valve.
- Voltage stabilizer. The device ensures stable operation of the water intake system and protects the pump.
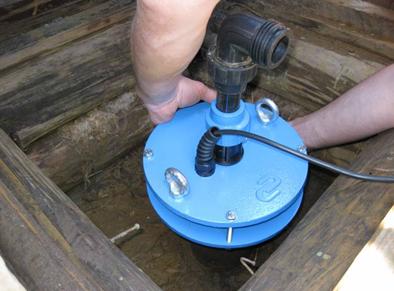
- Downhole head. Protects the well from dirt and debris, serves as a support for mounting the pump.
- Shrink sleeve.
- Steel cable for attaching the electric pump to the head.
- Special waterproof cable for supplying voltage to a submersible borehole electric pump.
- Metal-plastic finting and pipes leading to the house.
Living in a private house is not only a number of advantages, but also a lot of problems, ranging from a centralized gas pipeline to the most important convenience, without which life is almost impossible - water. In this case, water can be brought to the house from a dug well or an existing well.
It is possible to provide supply to the house if you connect a submersible pump. Such a device, depending on the model and configuration, is quite capable of providing water to the whole family living in a private house. And how to connect a downhole pump, you will learn from this article.
The connection diagram of the pump for the well is not so difficult to implement, provided, of course, you have basic skills and knowledge in such matters. If you do not know how to connect a submersible pump, then the recommendations below will help you organize this process as efficiently as possible.
How to connect well pump so that you forget about water supply problems for a long time? The answer is simple: to connect the pump to the well, or rather place it, you need to be as close as possible to the hydraulic hole, in places with good ventilation, especially in the summer.
The depth pump is connected on a flat surface, due to which it is possible to firmly fix it and, thereby, eliminate all sorts of unit movements during vibration that occur during operation.
The best option for the location of the pump unit is the caisson. This is a special recess, which is covered with a lid and locked, which eliminates all sorts of unauthorized penetrations by curious children and neighbors.
Outgoing pipes from the device must be buried in the ground below the freezing level. Thanks to this, it will be possible to exclude freezing and, as a consequence, cracking of the pipeline system.
For example, the device "Agidel M", which is a summer version of the models of such units, is used to irrigate lawns, gardens and water supply of small steam rooms.
Connecting a submersible pump of this type is very simple, just place it on a solid, flat and even area and bring the entire pipeline system.
The connection of the borehole pump to the automation should be carried out by qualified plumbers, but if you still decided to carry out these works on your own, then you need to check and make sure that the technical and operational characteristics of the device and the power supply network are in accordance.
The connection diagram of the deep pump involves the use of a 220V network, therefore, when connecting such a device, be sure to take care of the presence of safety devices and do not forget to take measures to ground the device. This will help not only to avoid the breakdown of the device for pumping water during voltage drops in the general network, but also to eliminate all kinds of “leakage” of current that can break through the unit during its operation and thereby harm the health of the user.
Before turning on the unit, its housing must be filled with water through the hole located at the top of the unit.
It is extremely undesirable to run installations of this type "dry." This can disable one or several mechanisms at once. In order to extend the operational life of the unit, it is better not to spare money and equip it with a special device that will act as a controller and, in case of any danger of dry operation, it will operate and turn off the motor.
Often, the connection diagram of a submersible pump initially assumes the presence of the function described above, although such devices cost a little more, but at the same time, in the future you will be able to save on unscheduled repairs.
When connecting the pump to the hydraulic hole, it is necessary to be guided by the following rule: metal-plastic pipes are supplied to installations of this type, the inner diameter of which is not less than the diametric size of the inlet and outlet nozzles of the unit.
It is not recommended to use flexible rubberized hoses as a pipeline system from the pump unit. The resulting vacuum during the operation of the apparatus provokes their compression, which will not very well affect the operational properties of both the pipeline itself and the unit.
The submersible pump connection diagram implies the completion of this process after filling with water, supplying electricity and installing the piping system.
After that, the pressure is regulated in accordance with the data regulated by the manufacturers. And only after that the hydraulic device can be put into operation.
VIDEO: Water well - arrangement after drilling
Downhole pump unit connection
Let's start with the most important, with the volume of the unit. If for a family of four there will be enough apparatus whose productivity does not exceed 60 l / min, then the gardener using such an aggregate to irrigate the site will need a more powerful device (at least 100 l / min). It all depends on the size of the garden and on the frequency, as well as the abundance of soil moisture.
The operation of the pump in the system will be long and correct, if you know how to correctly organize the hydraulic and electrical connections for such equipment:
- The scheme for connecting a well pump to a hydraulic hole means, first of all, a competent selection of a model of equipment for servicing its site. You should not buy heavy-duty units if you have a small garden and there is no increased demand (when the family has more than 4 people). Firstly, such models are not cheap, and secondly, their maintenance, or rather the provision of the necessary electricity, will cost you a pretty penny. However, you will not use it at full capacity.
- In addition to the pump unit itself, it will also require accessories to it. Connecting a submersible pump involves the use of cables with a cross section of at least 3 mm. This is due to the fact that the device will be in a suspended state, respectively, it needs to be insured.
- It is necessary to make loops on two clamps through which the cable will be passed. This is an additional insurance in case the mount on one clip is unscrewed during vibration.
- The kit with the pump unit has an electric cable, the length of which is enough to bring the equipment into the well and connect it from the outside. Also, together with the apparatus, there is a cable sealing connection - a pair of rolls of electrical tape, sealant and a lightning rod.
- The most optimal pipe option for such devices is low-pressure polyethylene products. Pipes are connected to the pumping equipment through fittings. The coupling has an inch size on the outside by 32. Since the dimensions are commensurate with the nozzles on the hydraulic unit, the coupling is first wound up, after which it is possible to start the pipe installation and installation.
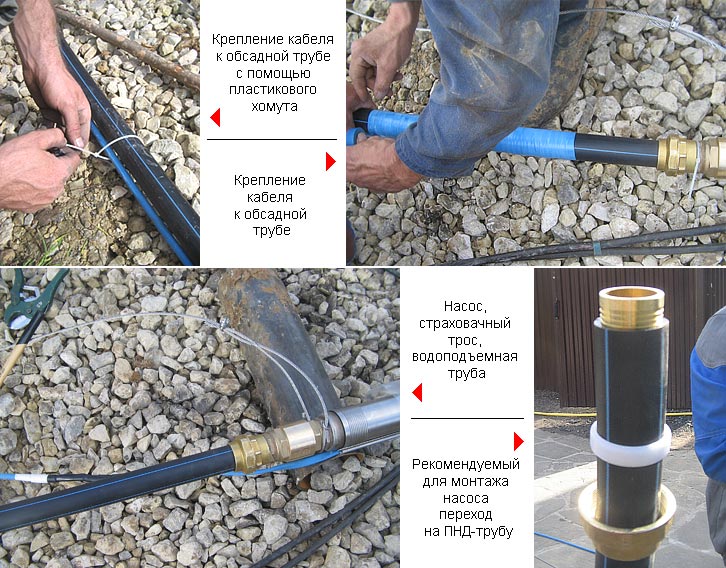
The connection of two products with internal thread requires the use of another connecting part, which is a nipple. It is screwed into the device for pumping water, the “return” valve is screwed onto it, well, and then the fitting for pipe mounting is screwed.
- As soon as the fastening of the hydraulic device through the cable is completed, the pipe is connected, and the cable is brought to the surface, you can lower the equipment into the well and check the operation of the unit.
Here, in fact, all the subtleties of bringing and putting into operation a submersible pump unit. We hope that these recommendations will help you realize the task in the best way.
VIDEO: Selection, strapping and installation